This is the time of year for 'bugs' you know, flu bug, cold bugs etc. However I seem to get infected regularly at this time of the year with the sewing bug.
The infection hit me unawares. I went to my local Hancock fabric store last night to look at the advertised lamp shades. Yeah, lamp shades at a fabric store, go figure, but Hancock's has always sort of leaned toward the total home decor look in their drapery fabric department. Well the lamp shades were too small for what I need, and I was left with some time to browse.
First I hit a 75% off book area. Oh Oh, I love books, especially any that teach me how to do something. I picked up two quilting books, one by Martha Pullen and one about Quick Watercolor quilting. Those had been on my maybe someday I will get them list anyway and the price was certainly great. The third book is a book for machine embroidery using the special threads like metallics. I've never had much luck using those threads on my machine and I am hoping this book will clear up some of my difficulties.
Did I say I love books? It's a good thing my hubby is not a book person, because I can buy and hold enough books for a two person household. People ask me how I am so 'gifted' or 'knowledgeable' about crafts, and I really have to confess that if you give me a book on it, I will be able to do it. I love how-to books.
OK so no sewing bug yet. I decide to sit and look at the pattern books, although I know I won't buy any right then, the sales on patterns are worth waiting for. Generally patterns are now running 17.00 a piece and I am really starting to sound like an old woman when I say I remember all patterns were 1.99 even the fanciest. So I found a really neat coat pattern, that just clicks with a recent Salvation Army buy. I found a men's camel colored cashmere coat there for 9.00 in excellent shape. The pattern I found might be able to cut it down into a swing style coat, with fake fur trim all on the edge and cuffs. The pattern is really great. The design idea has my creative juices flowing. And ouch, there's the first sewing bug bite. I almost went looking for the fake fur fabric, but decided to wait until I got the pattern.
Now bitten, I browsed the fabric aisles. Fabric has gotten expensive, but is absolutely amazing at the variety available. I saw wonderful fancy fabrics for glamour dresses, cottons for quilts with every pattern and color, plush warm fabrics for keeping warm this winter. But I knew I was under the sewing bug fever when I hit the baby fabrics and saw the best thermal fabric for 'onesies' with an adorable print. We do have a neice expecting, and my mind was saying, look how many you could get out of two yards of fabric.
Excuse while I go and lay down and get over this fever. It's either that, or go and dust off the sewing machine and not do anything else for the next month.
CW
Wednesday, November 15, 2006
Sunday, October 29, 2006
Jamestown and Indian cordage
Recently we spent a very pleasant afternoon at Jamestown. Like Williamsburg, this is another trip into the past, and especially the beginning of settlement of this Virginia area.
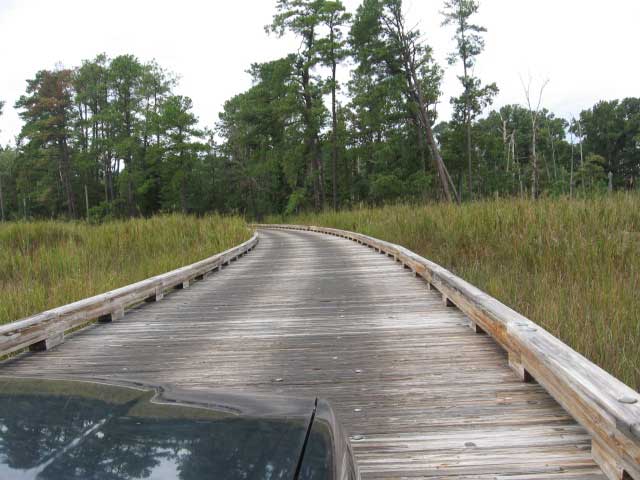
The first area we visited was the state park. This is the actual land of the original settlement, although none of the original buildings are there anymore. In fact, the entire visit consisted of a five mile drive through swamp land. I was amazed just how desolate it was. I did not see any wildlife, not even water fowl. Part of the road looked like this:

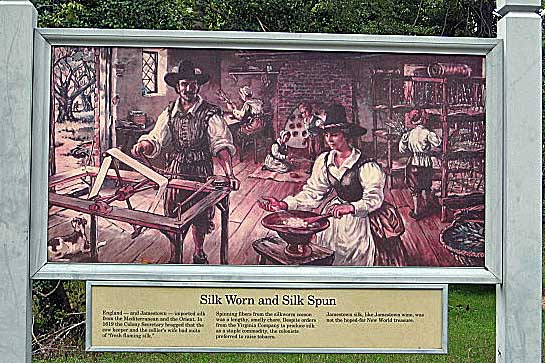
Along the five mile drive, there would be pull offs, with sign boards explaining important parts of the settlement. It was interesting reading. But imagine my surprise when we pulled up to this sign:
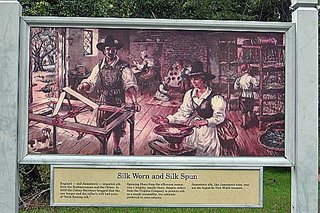
Yes! they actually raised and reeled silk worms at the original Jamestown. I could not get the photo clear enough for you to read the words. It explains that the business of silk was moderately successful, because it was so expensive to bring silk to the colony. However the inferior quality of the fabric, along with the 'horrific' smell, meant the industry eventually died out.
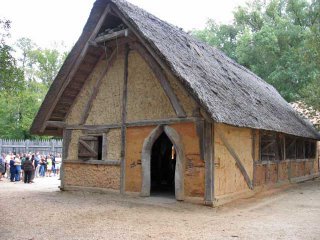
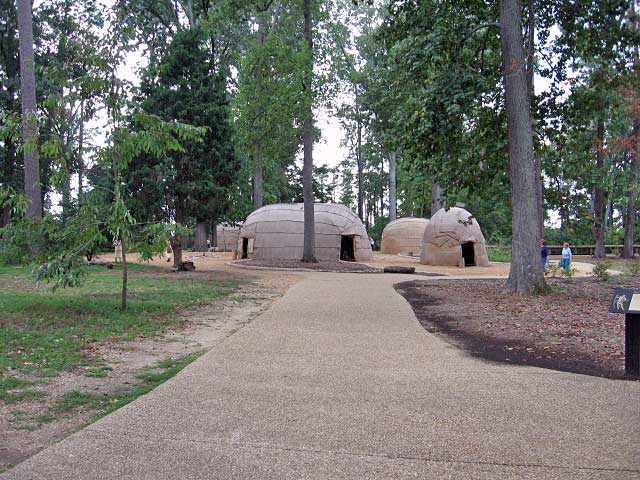
After this drive we went to the actual rebuilt Jamestown location. This has a brand new visitor center, lots of history and artifacts, a movie about the history of Jamestown as well as a recreated Indian village and settlers fort. When you walk out of the visitors center and down the path, you ease back into time and finally see this in the trees:
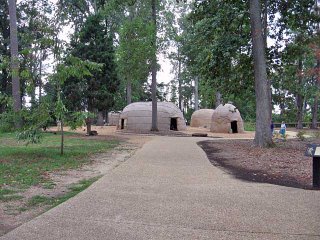
The reenactors were dressed in lovely buckskin, used original antler tools and had a primitive garden growing. Although their survival no longer depends on their skills, these people were doing the daily life of the Indian, at least for their eight hour shift! I was fascinated by the construction of the hut, made with stitched together reed. Here's a picture of the outside of the hut:
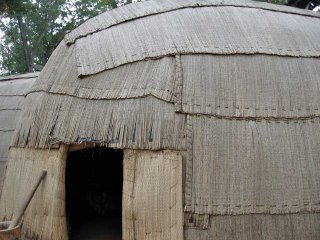
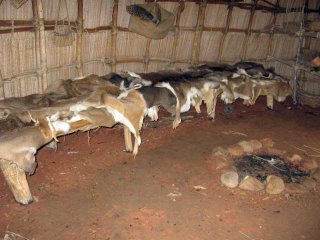
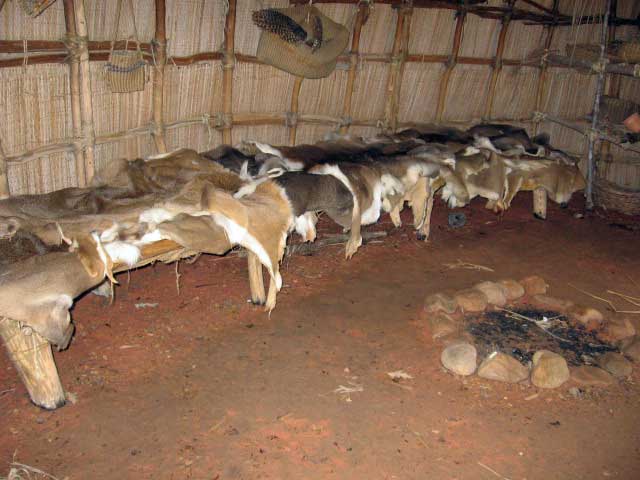
And even more authentic, this inside of the hut:
I spent a long time talking to one lady that was weaving a basket from cordage, made with grass. She had a younger girl, twisting and twirling the strands, with her fingers and on her knee. It's your very basic finger spinning, and was the basis for all of the fiber work done by these Indians. Even sinew would be corded in this fashion, and then hung with a weight to stretch and bind the cordage into a tight bond. If you are not familiar with this method of making cord, go here and look at the left hand side bar for a moving illustration.
I found that website while research a plant mentioned to me while I talked to the Indian man that was making bowstrings. He said that the Indians had discovered that sinew strips had the problem of stretching when they got wet, and that was disasterous when used for bowstrings. At some point they started using the inner bark of the dogbane plant, which will strip out in very fine fibers once the plant stem is dead. This website gives some good information on just how the plant is used, and how to strip the fiber from the bark. It is a wide spread plant and could have been used to replace the hemp industry if persued. But like all things of history, once a course is set, it seldom seems there is room for new ideas.
I left the Indian village musing over just who first discovered those fibers in that plant stem. Was some Indian lady, sitting in her hut, fussing about the fibrous content of this stem? Did her husband, picking up the discarded strands try and handle it like the sinew bowstring he usually made? Or did some Indian youngster pick it up, practice making cord and tie up their hair for the next day's work only to have another friend pull it out as an emergency bowstring! Ah, it was a fun muse.
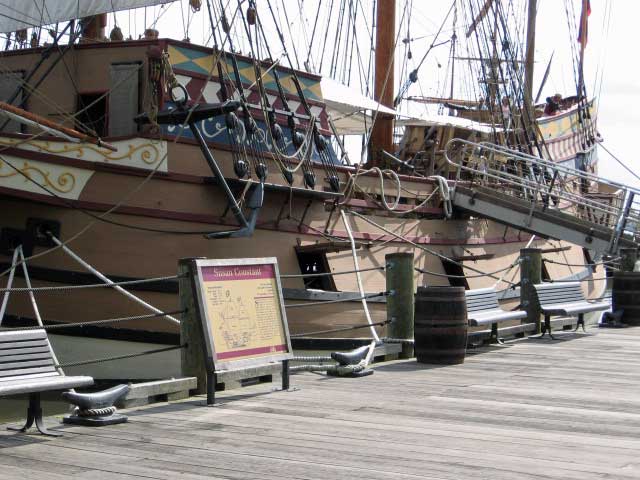
Since Jamestown is the location of the landing of the ships, they have two recreated ships there on the water. These can be boarded and explored while several historical folk answer questions. The settlers left England late Dec, about five days before Christmas. Oh what a Christmas that must have been, that first on out on the high seas. It took them until almost May 1st to reach Jamestown and they lived all of those months on three tiny ships. They did not just sail straight across the Atlantic (or as it was known in that period of time in England, the western sea). They went south to the islands, and hopped along there following the gulf stream and then up again north on that same gulf stream. Thus it took them those many months to make the trip.
Here's a picture of one ship, the Susan Constant:

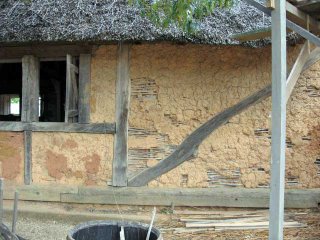
After those close quarters of the ship, how wonderful it must have been to be on land. The settlers had plenty of materials to work with, but oh how hard that work must have been to build even one house. This roofing was thatch:
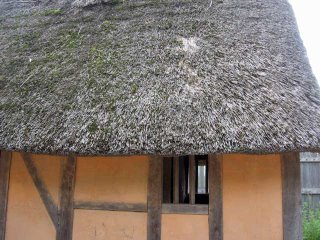
And the sides, mud and waddle:
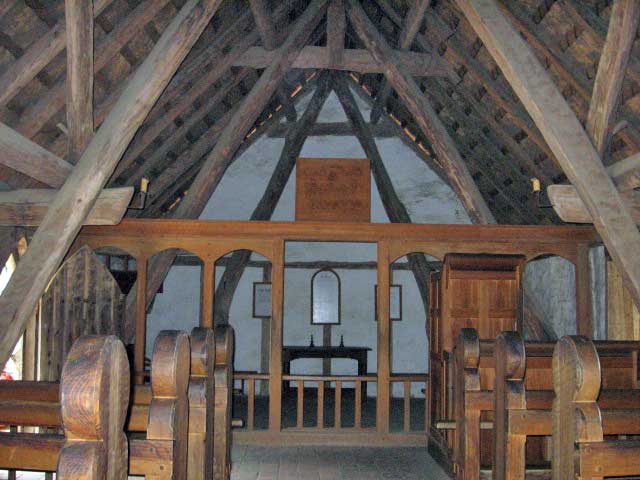
But second after building a roof for their heads, was the church. And it was by far the most beautiful of what I saw at Jamestown, for all of it's simplicity it still speaks of worship and hope and love.

All people will see history in their own eyes, and so this was a fiber slant to Jamestown's history. There is much much more there to see and do, and each visitor will bring their own slant to the history.
CW
The first area we visited was the state park. This is the actual land of the original settlement, although none of the original buildings are there anymore. In fact, the entire visit consisted of a five mile drive through swamp land. I was amazed just how desolate it was. I did not see any wildlife, not even water fowl. Part of the road looked like this:
Along the five mile drive, there would be pull offs, with sign boards explaining important parts of the settlement. It was interesting reading. But imagine my surprise when we pulled up to this sign:
Yes! they actually raised and reeled silk worms at the original Jamestown. I could not get the photo clear enough for you to read the words. It explains that the business of silk was moderately successful, because it was so expensive to bring silk to the colony. However the inferior quality of the fabric, along with the 'horrific' smell, meant the industry eventually died out.
After this drive we went to the actual rebuilt Jamestown location. This has a brand new visitor center, lots of history and artifacts, a movie about the history of Jamestown as well as a recreated Indian village and settlers fort. When you walk out of the visitors center and down the path, you ease back into time and finally see this in the trees:
The reenactors were dressed in lovely buckskin, used original antler tools and had a primitive garden growing. Although their survival no longer depends on their skills, these people were doing the daily life of the Indian, at least for their eight hour shift! I was fascinated by the construction of the hut, made with stitched together reed. Here's a picture of the outside of the hut:

And even more authentic, this inside of the hut:
I spent a long time talking to one lady that was weaving a basket from cordage, made with grass. She had a younger girl, twisting and twirling the strands, with her fingers and on her knee. It's your very basic finger spinning, and was the basis for all of the fiber work done by these Indians. Even sinew would be corded in this fashion, and then hung with a weight to stretch and bind the cordage into a tight bond. If you are not familiar with this method of making cord, go here and look at the left hand side bar for a moving illustration.
I found that website while research a plant mentioned to me while I talked to the Indian man that was making bowstrings. He said that the Indians had discovered that sinew strips had the problem of stretching when they got wet, and that was disasterous when used for bowstrings. At some point they started using the inner bark of the dogbane plant, which will strip out in very fine fibers once the plant stem is dead. This website gives some good information on just how the plant is used, and how to strip the fiber from the bark. It is a wide spread plant and could have been used to replace the hemp industry if persued. But like all things of history, once a course is set, it seldom seems there is room for new ideas.
I left the Indian village musing over just who first discovered those fibers in that plant stem. Was some Indian lady, sitting in her hut, fussing about the fibrous content of this stem? Did her husband, picking up the discarded strands try and handle it like the sinew bowstring he usually made? Or did some Indian youngster pick it up, practice making cord and tie up their hair for the next day's work only to have another friend pull it out as an emergency bowstring! Ah, it was a fun muse.
Since Jamestown is the location of the landing of the ships, they have two recreated ships there on the water. These can be boarded and explored while several historical folk answer questions. The settlers left England late Dec, about five days before Christmas. Oh what a Christmas that must have been, that first on out on the high seas. It took them until almost May 1st to reach Jamestown and they lived all of those months on three tiny ships. They did not just sail straight across the Atlantic (or as it was known in that period of time in England, the western sea). They went south to the islands, and hopped along there following the gulf stream and then up again north on that same gulf stream. Thus it took them those many months to make the trip.
Here's a picture of one ship, the Susan Constant:
After those close quarters of the ship, how wonderful it must have been to be on land. The settlers had plenty of materials to work with, but oh how hard that work must have been to build even one house. This roofing was thatch:

And the sides, mud and waddle:

But second after building a roof for their heads, was the church. And it was by far the most beautiful of what I saw at Jamestown, for all of it's simplicity it still speaks of worship and hope and love.

All people will see history in their own eyes, and so this was a fiber slant to Jamestown's history. There is much much more there to see and do, and each visitor will bring their own slant to the history.
CW
Tuesday, October 17, 2006
Colonial Williamsburg
Recently, my husband and I spent three days at Colonial Williamsburg in Virginia. It is a vacation I recommend for children and adults alike. If you go, give yourself plenty of time, this is best experienced at a leisurely pace, with lots of time to stop, look, listen and talk.
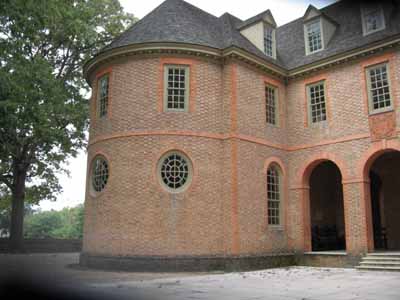
The reconstructed town has many buildings, some famous, like the govenors palace (not shown here) or the capitol building, shown here:

I especially loved the windows and that is why the picture is included in this post. This building was the heart of the government. Trials occurred here, delegates met to discuss, much as our government representatives do today, about the mundane issues of keeping a government afloat. However there was one special issue during this period, that of the declaration of independence from the mother country. As the guide walked us through the building and talked of how it all happened, it made history come alive, just like reading a historical novel.
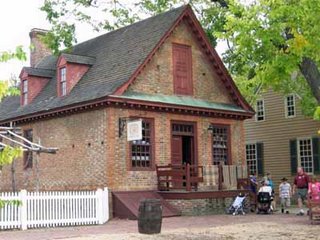
Most of the building though are the common shops and houses. As you stroll along the street many of these are open and available to the public, like the silversmith's house, shown below.
Did you know that in those days you could take a silver spoon to pay for an item? They would snip off and weigh the silver based on the current price. As for your poor mutilated spoon, well you could take that to the silversmith and have him recreate a new one for you, although it would probably be the smaller sized salt spoon.
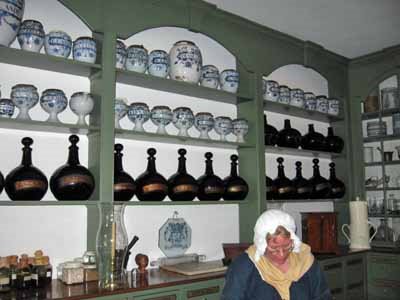
Being in the medical profession, my favorite building was the apothecary. This was run by a doctor and his assistant. When you walked through the door, this is what you would see:

These bottles and jars are not original to Williamsburg itself, but are from England at the exact same period of time. They were in fantastic shape for over 200 years old! When you were ill, you went to see the doctor at the apothecary. He had his office behind the storefront, and would decide what you needed to buy to make you better. You of course had brought your own bottle and jar for whatever ointment, tincture, herb, or other exotic types of medicines of the day. If for some reason you had to have the doctor come to your house, the bill would include not only the housecall fee and medicines, but also a price per mile he had to travel. The thought was if he had to close up his business just to go see you, you had to pay for that loss of income! So the era of the friendly housecalling doctor was much yet to come.
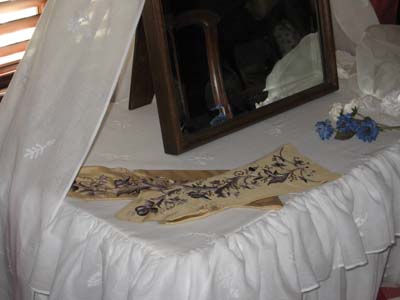
Several of the homes were open for touring, a nice look into the daily life of the colonials. Just to get this post back to the fiber theme, here is a picture of a lady's dressing table:
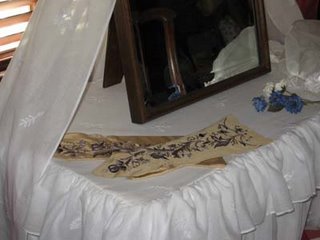
Those are hand embroidered kid gloves, and very lovely indeed.
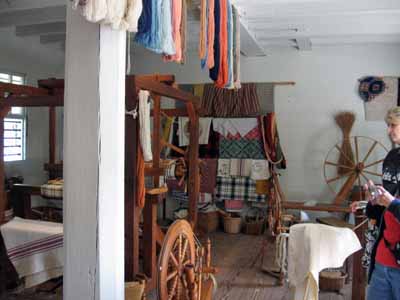
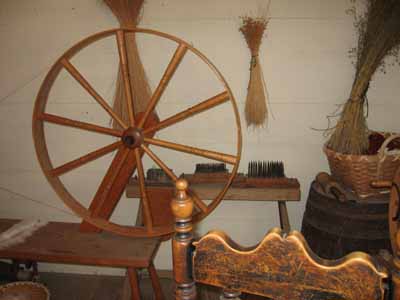
Most larger households had what they called a 'working yard'. The mistress of the house was in charge of all of this. The out buildings may include kitchens, smoke houses, gardens, orchards, blacksmith and stables. In one working yard, we were able to visit the weavers place.
Here's what you'd see as you walk into the door:

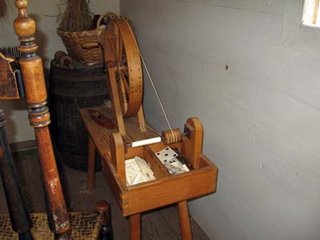
There was a weaver working at a large loom, making a bed rug. She was very willing to talk about her daily work and I learned some interesting facts. First of all, even though there were many spinning wheels there, she said that these colonials were actually wealthy by that day's standards, due to the sale of tobacco. And so just like us today, when we need a large amount of yarn for weaving, they _bought_ their yarn! But another interesting historical fiber tidbit is that when the weather was rainy and the slaves could not work in the field, many would spend time carding and spinning yarn, which was theirs to keep.
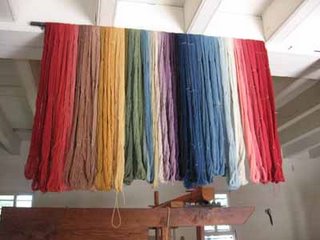
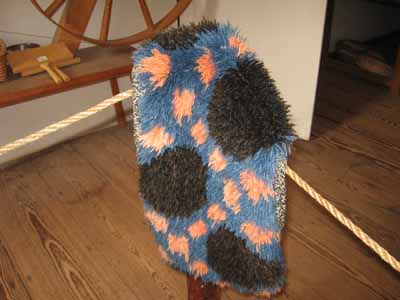
The weaver said that the yarn hanging above her loom was from a longwool breed, natural dyed. I felt some and it did have a rough hand to it. However, she showed me a woven piece requested by the mistress that was made in a very soft wool, so they must have had some shorter softer staple wool available.
Here's a picture of the yarn:
There was a great wheel there of course:
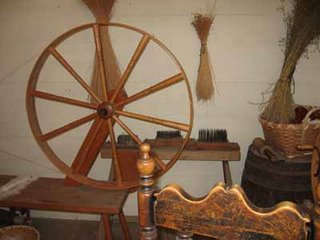
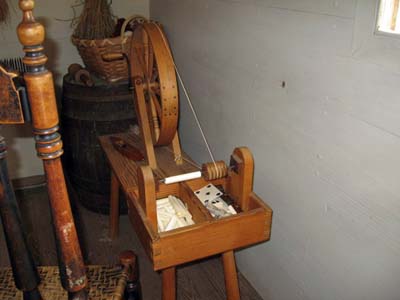
But look at this next picture closely, I found this much more interesting than the great wheel. It is a quill wheel, and I had never seen one before.
If you look you can see what looks like a playing card, and that is exactly what it is, I saw a deck of cards for sale in the printer shop. They were using them to make quills for the great wheels bobbin. I know corn husks are more traditional, but this was an urban area! Or maybe it's just an interesting past time, to amuse a child while the mother spun on the wheel.
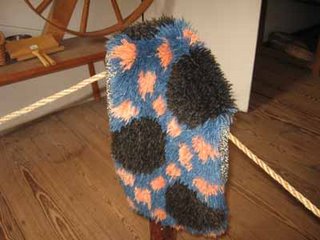
This photo comes under the 'I find that hard to believe' category, but I think I have the story straight from the weaver. It is a small replica version of an actual bed rug from the colonial period of time. Rugs were not put on the floor, but were used on beds for warmth. I can believe that part. What I find hard to believe is that that design is truly of the period, look how 1970's it looks!
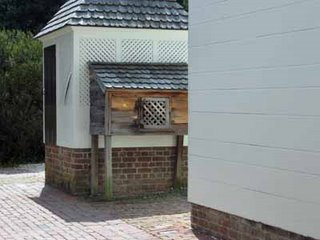
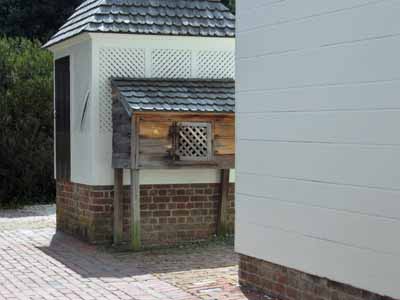
When I finally left the weaver's place I strolled around the rest of the working yard. There was a lovely dovecote, as well as gardens with fall crops still in great production. Under a tent, two basket makers were showing how the wood was thinly shaved and used to weave all styles of baskets. My favorite was a tiny one hanging from the tent pole, that contained suet for the birds.
Here's how they used twigs in part of the chicken coop:

Very different from our modern day chicken coops. However, somethings don't change and here's a photo of the rabbit hutch to prove it:
These are just a few of the hundreds of photos I took while there. Digital cameras are wonderful when traveling. Each evening I went back to where we stayed, downloaded the photos to the laptop, and sorted and labelled them while it was all fresh in my mind. So different than the albums of photos I have from my vacations in the 80's! Just where was that place in that photo? Ah, the wonders of technology arrived just in my time of failing memory!
Next post: Jamestown
CW
The reconstructed town has many buildings, some famous, like the govenors palace (not shown here) or the capitol building, shown here:
I especially loved the windows and that is why the picture is included in this post. This building was the heart of the government. Trials occurred here, delegates met to discuss, much as our government representatives do today, about the mundane issues of keeping a government afloat. However there was one special issue during this period, that of the declaration of independence from the mother country. As the guide walked us through the building and talked of how it all happened, it made history come alive, just like reading a historical novel.
Most of the building though are the common shops and houses. As you stroll along the street many of these are open and available to the public, like the silversmith's house, shown below.

Did you know that in those days you could take a silver spoon to pay for an item? They would snip off and weigh the silver based on the current price. As for your poor mutilated spoon, well you could take that to the silversmith and have him recreate a new one for you, although it would probably be the smaller sized salt spoon.
Being in the medical profession, my favorite building was the apothecary. This was run by a doctor and his assistant. When you walked through the door, this is what you would see:
These bottles and jars are not original to Williamsburg itself, but are from England at the exact same period of time. They were in fantastic shape for over 200 years old! When you were ill, you went to see the doctor at the apothecary. He had his office behind the storefront, and would decide what you needed to buy to make you better. You of course had brought your own bottle and jar for whatever ointment, tincture, herb, or other exotic types of medicines of the day. If for some reason you had to have the doctor come to your house, the bill would include not only the housecall fee and medicines, but also a price per mile he had to travel. The thought was if he had to close up his business just to go see you, you had to pay for that loss of income! So the era of the friendly housecalling doctor was much yet to come.
Several of the homes were open for touring, a nice look into the daily life of the colonials. Just to get this post back to the fiber theme, here is a picture of a lady's dressing table:
Those are hand embroidered kid gloves, and very lovely indeed.
Most larger households had what they called a 'working yard'. The mistress of the house was in charge of all of this. The out buildings may include kitchens, smoke houses, gardens, orchards, blacksmith and stables. In one working yard, we were able to visit the weavers place.
Here's what you'd see as you walk into the door:
There was a weaver working at a large loom, making a bed rug. She was very willing to talk about her daily work and I learned some interesting facts. First of all, even though there were many spinning wheels there, she said that these colonials were actually wealthy by that day's standards, due to the sale of tobacco. And so just like us today, when we need a large amount of yarn for weaving, they _bought_ their yarn! But another interesting historical fiber tidbit is that when the weather was rainy and the slaves could not work in the field, many would spend time carding and spinning yarn, which was theirs to keep.
The weaver said that the yarn hanging above her loom was from a longwool breed, natural dyed. I felt some and it did have a rough hand to it. However, she showed me a woven piece requested by the mistress that was made in a very soft wool, so they must have had some shorter softer staple wool available.
Here's a picture of the yarn:

There was a great wheel there of course:
But look at this next picture closely, I found this much more interesting than the great wheel. It is a quill wheel, and I had never seen one before.
If you look you can see what looks like a playing card, and that is exactly what it is, I saw a deck of cards for sale in the printer shop. They were using them to make quills for the great wheels bobbin. I know corn husks are more traditional, but this was an urban area! Or maybe it's just an interesting past time, to amuse a child while the mother spun on the wheel.
This photo comes under the 'I find that hard to believe' category, but I think I have the story straight from the weaver. It is a small replica version of an actual bed rug from the colonial period of time. Rugs were not put on the floor, but were used on beds for warmth. I can believe that part. What I find hard to believe is that that design is truly of the period, look how 1970's it looks!
When I finally left the weaver's place I strolled around the rest of the working yard. There was a lovely dovecote, as well as gardens with fall crops still in great production. Under a tent, two basket makers were showing how the wood was thinly shaved and used to weave all styles of baskets. My favorite was a tiny one hanging from the tent pole, that contained suet for the birds.
Here's how they used twigs in part of the chicken coop:

Very different from our modern day chicken coops. However, somethings don't change and here's a photo of the rabbit hutch to prove it:
These are just a few of the hundreds of photos I took while there. Digital cameras are wonderful when traveling. Each evening I went back to where we stayed, downloaded the photos to the laptop, and sorted and labelled them while it was all fresh in my mind. So different than the albums of photos I have from my vacations in the 80's! Just where was that place in that photo? Ah, the wonders of technology arrived just in my time of failing memory!
Next post: Jamestown
CW
Thursday, October 05, 2006
yak fiber and simple knits
It's been awhile since I have had a large spindle spinning project. I wanted something to take to our Tuesday gathering at Barnes and Nobles. This group started out as a spinning group, but we have evolved into more of a knitting group although almost all of the group does spin. I had read on the internet a push for the first week of Oct to be a 'show off your skills' week, so I decided it was time to do some spinning in public.
I purchased this yak fiber last year, because I have never had the opportunity to spin this fiber. I bought it from Little barn

It is a natural deep rich brown color and is as soft as angora. I was surprised though by the short staple. Most fibers are barely a half inch long. I first tried using my small combs to pull some top, but there was no way to comb a fiber that short. So I got out my hand cards that I use for angora and carded about 2 oz. The photo shows one roulog from that carding. It spins very nicely as a carded fiber, although I am not going to get it as thin as I originally envisioned the final yarn. I am thinking it will take me a year to spin all of the 8 oz I bought, because just spinning for an hour at the get together, barely touched the 2 oz I had carded. If it continues to spin this way, I am hoping to have enough 2 ply yarn for a cozy bed jacket for myself, or maybe in these days I should say, a computer jacket!
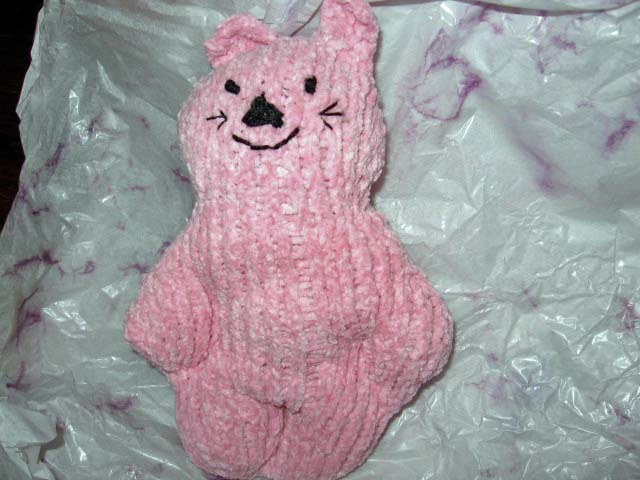
After pontificating in my last post about knitting to a new level of perfection, I have to meekly back up and submit my vacation knitting, a very simple knit toy for a coworkers baby. The pattern is from Oat Couture

It's an easy and quick knit done in a chenille yarn, stuffed and then a face embroidered on the front. The body is the same for all of the animals, but there are directions for knitting different ears, and embroidering different faces. It must not really matter though, because when I gave it to the coworker at the shower, she said, 'what a cute bunny!' Well they do know I raise and love bunnies, so it was a natural mistake, but in truth, the one I knit was suppose to be the kitty :)
CW
I purchased this yak fiber last year, because I have never had the opportunity to spin this fiber. I bought it from Little barn
It is a natural deep rich brown color and is as soft as angora. I was surprised though by the short staple. Most fibers are barely a half inch long. I first tried using my small combs to pull some top, but there was no way to comb a fiber that short. So I got out my hand cards that I use for angora and carded about 2 oz. The photo shows one roulog from that carding. It spins very nicely as a carded fiber, although I am not going to get it as thin as I originally envisioned the final yarn. I am thinking it will take me a year to spin all of the 8 oz I bought, because just spinning for an hour at the get together, barely touched the 2 oz I had carded. If it continues to spin this way, I am hoping to have enough 2 ply yarn for a cozy bed jacket for myself, or maybe in these days I should say, a computer jacket!
After pontificating in my last post about knitting to a new level of perfection, I have to meekly back up and submit my vacation knitting, a very simple knit toy for a coworkers baby. The pattern is from Oat Couture
It's an easy and quick knit done in a chenille yarn, stuffed and then a face embroidered on the front. The body is the same for all of the animals, but there are directions for knitting different ears, and embroidering different faces. It must not really matter though, because when I gave it to the coworker at the shower, she said, 'what a cute bunny!' Well they do know I raise and love bunnies, so it was a natural mistake, but in truth, the one I knit was suppose to be the kitty :)
CW
Tuesday, September 19, 2006
Crafting to a new level of perfection
After years of knitting, spinning, sewing (I'll stop there, the list could go on and on), with the attitude 'Shrug, that's good enough', I have decided that maybe it really isn't. Lately I have been looking at just what makes the difference between good enough, and amazingly impressive.
This started, as most of my musings do, with a conversation with my daughter about certificates of excellence (known as COE's). These are awarded to a select few that are judged in whatever area they work in and the judging seems to be set to select those that come as close to perfect as they can. The process that the person goes through, in attempting to reach perfectionism, is suppose to teach them so much, that they are then ready to teach others what they know.
I know myself well enough to know I would soon be frustrated by the process, and would not have the patience to redo something over and over again, to reach that near perfect skein or swatch. My enjoyment comes from the first time I do something. Even knitting, repetitive by nature, is still very engaging the first time through a new pattern. And I may go all the way through that pattern and not make a 'mistake'. So is it perfect then? Well not if the gauge is incorrect for what I want to create. Not if the fabric created is too flimsy for the project in mind. The over and over again perfectionism in knitting comes into play trying to be perfect in each area. That's why one hears a few times that someone knit a sweater or socks and they 'fit perfectly'. Only a few times indeed.
This of course is one side of the see saw. The other is the total lack of concern about any of the knit stitches you make. The project will be whatever it will be. I have never been comfortable with that extreme either. However, I lose out on many chances to be very creative, or artistic, or innovative, by staying off that side of the see-saw.
I am reminded of the song, 'Stuck in the Middle with You'.
For years I have been crafting in that middle state. I am skilled in many areas, what I make looks good and holds up well, and yet it is not at a level that could be judged as outstanding. I have always said about my work, that my dream would be that it would end up in a museum someday in the future. I can not see that happening yet.
So this long ramble, is all to say that I have starting crafting with a new eye on the details. Ah yes, life is in the details, it is said. Was every stitch knitted at the same tension, was the pattern correct, did I really want it this size? It will slow me down, and I already craft at a snail's pace. But in truth, it's all about the process, right?
I am not sure I will be able to blog about my progress with this slide to perfect. It's not something easily put into words. It's an attitude adjustment, a change that makes me say 'Hmm, maybe that's not just good enough'. But the fun side of all of this comes from that old adage, practice makes perfect. Oh boy, another excuse to knit.
CW
Tuesday, September 05, 2006
Knitting until it fits
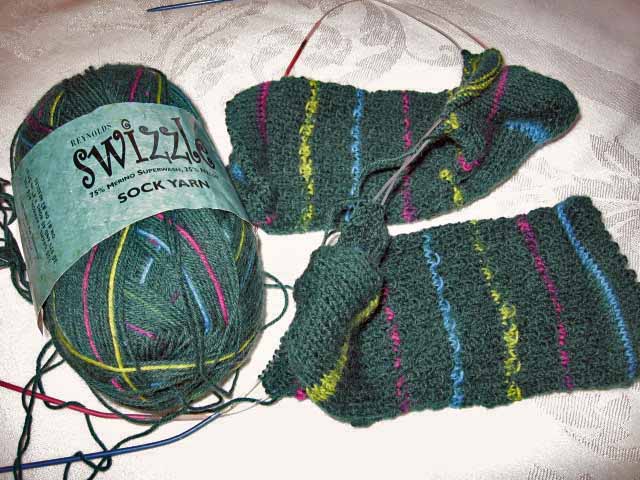
Before I get into the main reason for the blog post, here is a picture of my current success.

These are two socks on two circs and I am very happy with how the whole process went. I did a pair this way two years ago, but felt it was too fiddly and went back to knitting with DPN. However at the retreat three weeks ago, my knitting buddies got me going on this pair and it all has gone much easier the second time around. I even turned the heels with the circs instead of removing the sock and doing it on DPN. So I have both heels turned, and the socks should be done by the time I go on vacation at the end of the month. The pattern is called the snake scale sock (SSS) because the stitch K2, YO, K2, pass YO over the K2, puts a bar of yarn on the front of the two stitches. The overall effect looks like scales. The yarn is Reynold's Swizzle, in a deep green with occasional stripes.
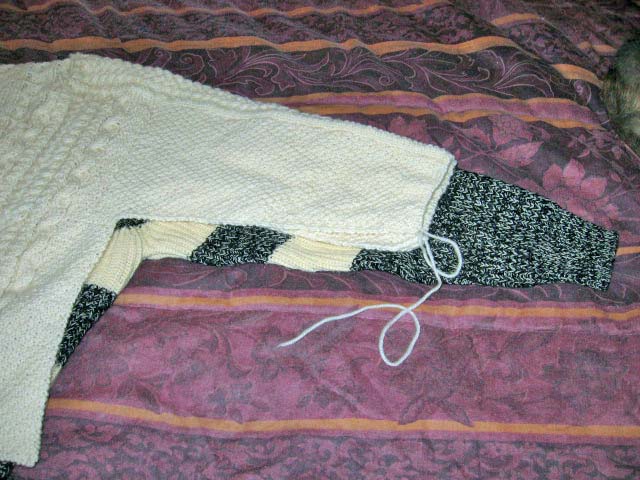
So the main reason for the title of this post is a sizing problem on the sweater I am knitting. The white sweater on the top is the FLAK aran I have been knitting for my hubby. The sweater below it, is the sweater he gave me as an example of a comfortable sweater to wear. My goal is to add on the necessary knitting, to make the aran the same size as the example sweater. I have knitted on the FLAK off and on all year, and I definately want a sweater that he will wear for many years. That makes all of this fuss worth the effort.

You can see by this photo, that the sweater width and even the sleeve width are too narrow. The length of the sleeves is not a concern, because I stopped knitting on them when I realized there was a problem in sizing. I just have to continue on the sleeve until I reach the correct length.

Here's a close up of the FLAK sleeve on top of the comparison sweater. It shows just how narrow the sleeve ended up. Also if you look under the arm, you can see how much I need to add to the width of the sweater.
I have been thinking about this problem the whole time I finished the back. It may not be obvious, but the sweater has been knitted flat, not circular. That means the whole length under the arm and down the sides is open. I took measurements while the sweater was on the example sweater, and I am ready to attack the problem.
I plan to start under one arm with DPN and pick up as many stitches as I can without causing a bump. It may only be three or four stitches, that will get increased rapidly over the next three or four rows, until I have a total of 2" needed for the width of the sleeve. Then I will knit back and forth, and work my way down the inside of the sleeve, knitting each side of the sleeve together with this increase piece to close the seam. I can not really call this piece a gusset, since it will run down the entire length of the sleeve. I doubt there is a name for what I am doing, it is entirely outside of the original pattern, and certainly not in any normal sweater knitting. I _should_ have knitted the sleeve the correct size to begin with, but I refuse to frog this and start over, or give it away to someone tiny when I worked so much intention into it as being my hubby's sweater!
Once I reach the bottom of the sleeve, I will pick up all stitches around, and add length to the sleeve, ending finally in a ribbing.
The sides of the sweater will be basically the same plan. I need a total of three inches on each side and I will add that as a piece that runs down the side and closes the seam at the same time. When I get to the bottom on both sides, I will pick up the whole sweater on a large circ needle and finish in ribbing. That will leave just adding a small amount of ribbing around the V neck and I will call it done!
I truly want this done for him by cool weather. One of course so he can wear it, but mostly for me. I am so over knitting on this sweater, and want to go on to something lacy! For me!
CW
These are two socks on two circs and I am very happy with how the whole process went. I did a pair this way two years ago, but felt it was too fiddly and went back to knitting with DPN. However at the retreat three weeks ago, my knitting buddies got me going on this pair and it all has gone much easier the second time around. I even turned the heels with the circs instead of removing the sock and doing it on DPN. So I have both heels turned, and the socks should be done by the time I go on vacation at the end of the month. The pattern is called the snake scale sock (SSS) because the stitch K2, YO, K2, pass YO over the K2, puts a bar of yarn on the front of the two stitches. The overall effect looks like scales. The yarn is Reynold's Swizzle, in a deep green with occasional stripes.
So the main reason for the title of this post is a sizing problem on the sweater I am knitting. The white sweater on the top is the FLAK aran I have been knitting for my hubby. The sweater below it, is the sweater he gave me as an example of a comfortable sweater to wear. My goal is to add on the necessary knitting, to make the aran the same size as the example sweater. I have knitted on the FLAK off and on all year, and I definately want a sweater that he will wear for many years. That makes all of this fuss worth the effort.

You can see by this photo, that the sweater width and even the sleeve width are too narrow. The length of the sleeves is not a concern, because I stopped knitting on them when I realized there was a problem in sizing. I just have to continue on the sleeve until I reach the correct length.
Here's a close up of the FLAK sleeve on top of the comparison sweater. It shows just how narrow the sleeve ended up. Also if you look under the arm, you can see how much I need to add to the width of the sweater.
I have been thinking about this problem the whole time I finished the back. It may not be obvious, but the sweater has been knitted flat, not circular. That means the whole length under the arm and down the sides is open. I took measurements while the sweater was on the example sweater, and I am ready to attack the problem.
I plan to start under one arm with DPN and pick up as many stitches as I can without causing a bump. It may only be three or four stitches, that will get increased rapidly over the next three or four rows, until I have a total of 2" needed for the width of the sleeve. Then I will knit back and forth, and work my way down the inside of the sleeve, knitting each side of the sleeve together with this increase piece to close the seam. I can not really call this piece a gusset, since it will run down the entire length of the sleeve. I doubt there is a name for what I am doing, it is entirely outside of the original pattern, and certainly not in any normal sweater knitting. I _should_ have knitted the sleeve the correct size to begin with, but I refuse to frog this and start over, or give it away to someone tiny when I worked so much intention into it as being my hubby's sweater!
Once I reach the bottom of the sleeve, I will pick up all stitches around, and add length to the sleeve, ending finally in a ribbing.
The sides of the sweater will be basically the same plan. I need a total of three inches on each side and I will add that as a piece that runs down the side and closes the seam at the same time. When I get to the bottom on both sides, I will pick up the whole sweater on a large circ needle and finish in ribbing. That will leave just adding a small amount of ribbing around the V neck and I will call it done!
I truly want this done for him by cool weather. One of course so he can wear it, but mostly for me. I am so over knitting on this sweater, and want to go on to something lacy! For me!
CW
Sunday, August 06, 2006
Summertime, and the living is easy
Somewhere! But not at my house lately.
I took a nice long vacation from blogdom but unfortunately not because I was catching the rays at the beach. More like suffering the heat on my riding mower. Summertime is not my favorite time of the year, being of good old northern Europe peasant blood, I like my spring and fall much better. And I let my snarky attitude about the heat and work get in the way of any blogging.
That's my story and I am sticking to it.
However I find myself in the mood to write an update. So here's the past two months in a nutshell. A pitifully small amount of it is fiber/knitting related.
The standard phrase these days on the internet, is 'life happened'. My work gets busier this time of the year, and I go home worn out from it. In mid July, I had my first time ever experience with testifying in court, and it was not easy. Add to these two major stressors, the minor day to day of broken water pipes, dead gas drier, flat tire and several serious spousal fights, well there it is, my summer of discontent.
So I sought refuge in distractions, both geeky and textile. In the technology area, I finally gave up the really lousy cable TV and got a dish, right in time for all the Olympic action. After that, I have been enjoying taping movies and series to watch. Like all the new Doctor Who episodes, old Lucille Ball movies, and several other of my favorite actors/actresses like Robin Williams, and Whoopi Goldberg. As well as catching some newly released flicks, like Sisterhood of the Traveling Pants, Madegascar, and others.
one would think with all of this DVD watching, I would be getting lots of knitting done. I have. The problem is that is has all been on one thing! Now I am all in favor of sticking to a project and getting it done. It's a great attitude when it comes to hats, scarves, even shawls and socks. But a full blown man's sweater, with almost every stitch a cable or purl on size 3 needles is a true test of one's preserverance. I am in awe of those in the FLAK group that have finished theirs and even made more than one.
I put aside the mystery shawl, my lovely lace that will seem like speed knitting once I pick it up again. I did knit a wonderful pair of socks for myself during May. I even started another pair of socks, when I just had to have a break from reading charts.
It is a beautiful sweater. I am sure that is what keeps me going on it. I have knitted it in what is the strangest order I have ever knit a sweater. First were the little saddles across the top of the shoulder. On one side of these I picked up stitches, casting on the neck edge between the two, then proceeded to knit in pattern down the back to the shoulder blades. This was repeated on the front, making increase as I worked down the front to created the V neck. Both were stopped at about shoulder blade level. Then stitches were picked up along the armhole edge front to back and the sleeve knitted down from there. After those were done (or almost done, I have not done any ribbing on the edge of either sleeve yet) the body was picked up and knitted down to the waist. That's where I am right now, with probably 30 rows to go until the ribbing.
Actually I am well within my deadline of Sept/Oct which in when hubby could actually wear it. Right now it is so hot here, I can not even get him to try it on!
I am so ready for it to be done. That fact alone drives me to pick up the sweater and knit on it instead of anything else. And oh, there is so much I want to knit. There's a mystery stole2 yahoo group which will be a perfect pattern for some cashmere yarn I have been saving. There's a new sock pattern in the sixsoc group that has snake skin scales pattern that everyone loves.
So it is definately time for cooler weather and some serious knitting. I can not wait. It's just a toss up about what will arrive first, the cool fall days, or the sweater to wear for them.
CW
Sunday, June 11, 2006
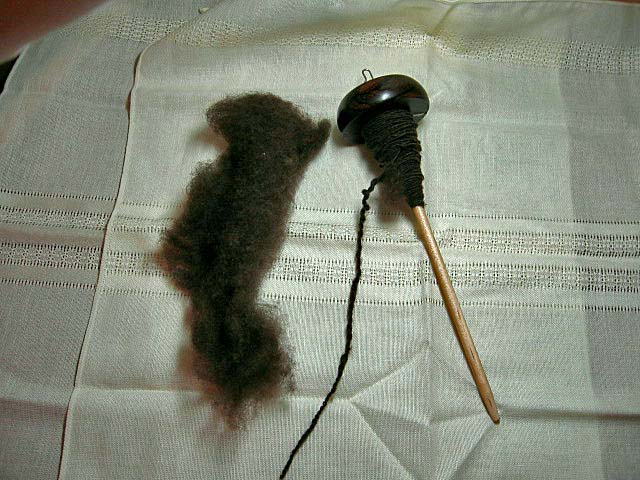
Official spinning olympic challenge totals
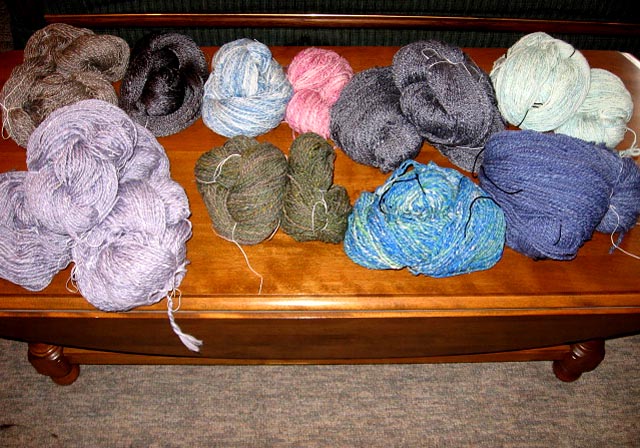
In this post, a picture really is worth a thousand words. This picture shows all of the skeins I spun during my self challenge olympic spinning. I got a rubbermaid tub of fiber and only spun it while watching the olympics. With the miracle of DVD recording, I just finished the last of the fiber and the last of the recordings today.
I strongly encourage anyone that does even a moderate amount of spinning, to set an extended period of time and keep track of time, yardage and ounces of fiber spun. I did just that for this challenge and found the statistics interesting. First of all, I did not set out to make a specific type of yarn wtih any of the fibers I chose during the challenge. I just let the fiber go to the type of yarn that flowed easiest from the drafting. I ended up with a wide range of WPI, but that's because I had a wide range of types of fiber. I make this point because I did not fiddly much with any of the fiber other than a bit more pre drafting. So there is no prep time in these figures, only spinning. They are also estimates, especially the time. I tried to keep good track of the total time, that was the hardest to remember to record. The fiber weight was easy to get with my scales, and the yardage came from my winding on my one yard niddy noddy.
Total time: 66.5 hours
Total weight: 66.75 oz
Total yards: 6739 (as singles, but the time included plying time)
Based on those figures, I can now say I spin on the average an ounce an hour, and produce around 100 yards.
I have photos of each of the skeins below, with more specific details for each fiber type.
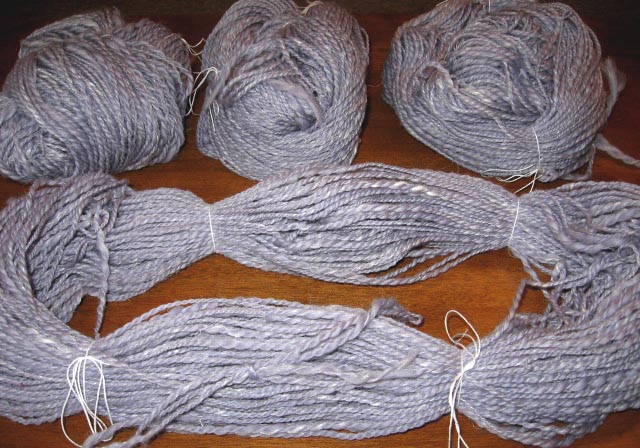
Fiber: 75% merino 25% angora dyed and then drum carded by me. Two skeins of 230 yards and 85 yards of 2 ply spun at 12 WPI. Total time 6 hours. This is a blend I have made over and over again to sell, and have several skeins of this blend in this batch. This was what I call a blueberry color and both the merino and angora are dyed the same color.

This is also a 75/25 merino angora blend. The merino was white and the angora was dyed aqua. These were carded together and spun into a 2 ply yarn at 12 WPI. There are two skeins one 280 yds and one 103 yds. Total time was 7.5 hours.
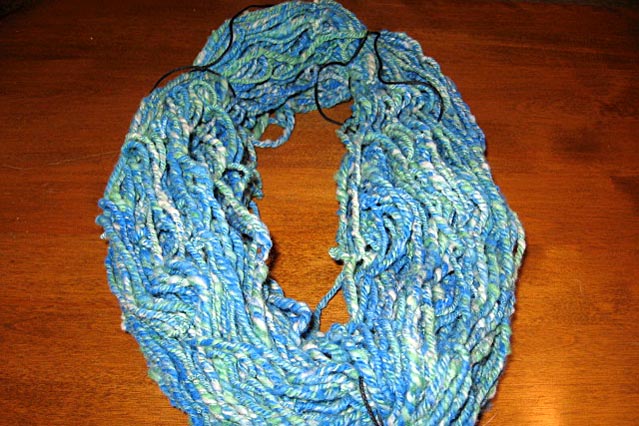
The base fiber here is Rambouilette. It was washed when I purchased it and was slightly felted. I dyed it with several colors to make a color I call Seas. Because it was so thik and thin, I decided to spin it all as a single and then navajo ply it into a 3 ply. There was 6.75 oz of fiber and one skein of 103 yards in a bulky 8 WPI yarn. Total time was 3.5 hours.

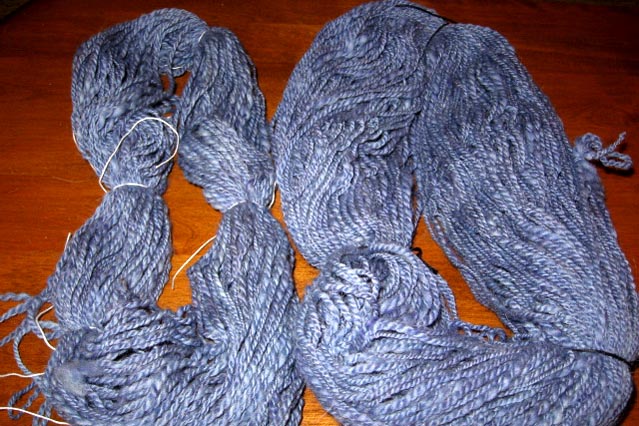
These beautiful skeins earn a silver medal from me: they are my second favorite of all I spun. The fiber is a merino/silk blend that I purchased when I went to SOAR in 2004. The color is a blue/gray blend. Total fiber was 12 oz and it spun into a smooth 16 WPI 2 ply yarn. There are three skeins, 333 yds, 317 yds and 132 yds. Total spinning time was 20 hours.

The base fiber on this is just called lambswool roving in a lovely gray color. I overdyed it in blues and greens to make this yarn. It spun up at 10 WPI and there are two skeins of 2 ply yarn, 152 yds and 67 yds. Not much yardage here, but I think there is enough for a pair of slippers for me. Fiber weight was 5 oz and total time was 4.5 hours.
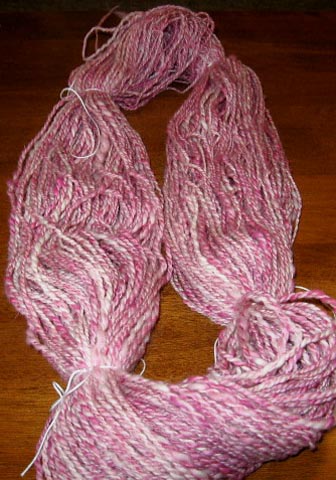
Here's more 75/25 merino/angora blend, this time with white merino and pink angora carded together. There was only 2 oz of this fiber and it spun into one skein of 2 ply at 14 WPI. Total time was 2 hours.

And another merino/angora blend, done in blue. There was 4 oz of fiber and it spun up at 12 WPI into one skein of 235 yards. Total time was 4 hours.
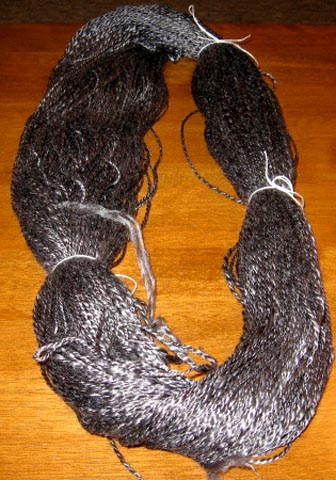
This is a very unusual blend, sort of the Jamaican bobsled team of the fiber world. It was labelled simply wool/linen and was a buy one get one special from a vendor. I shrugged and decided I would try spinning any blend at least once. I expected problems with it, but really it spun very easily. There was 16 oz of this dyed a lilac gray/silver color that had streaks of the off white linen in it. I have four skeins of the 10 WPI 2 ply yarn in 105 yds, 112 yds, 112 yds, and 115 yds. Total spinning time was 8 hours. I have no idea what I will do with this yarn, probably use it in a triangle loom shawl. It's a lovely spring color and should go well with other natural wool colors.
Here it is: The Gold medal winner. This yarn is absolutely beautiful, and the fiber was pure pleasure to spin. It is a merino/tencel blend commercially processed and dyed. The color is listed as coal. There was only 4 oz of this wonderful stuff and yet spinning at 20 WPI it gave me 440 yards. Total spinning time was 5 hours.
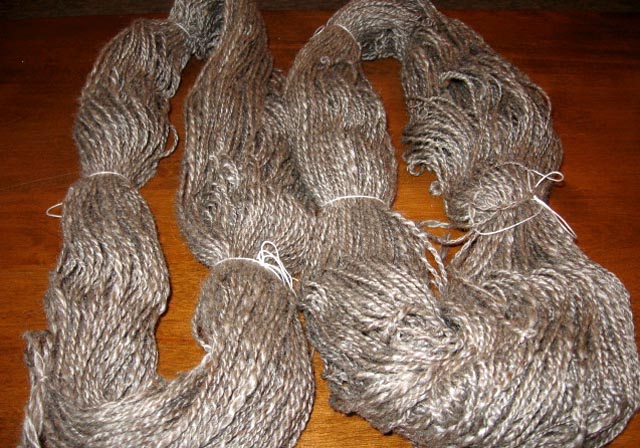
Finally the bronze medal winner, this lovely fiber was processed by someone else and is a natural colored lincoln wool with tussah silk blended in. There's an amazing shine to this wool, and I think most is coming from the lincoln. 8 oz of this fiber was all I could get at the time (another SOAR purchase and it was all she had left). It spun into two skeins of 2 ply for 112 yds and 164 yds spinning at 14 WPI. Total spinning time was 6 hours.
CW
Friday, May 12, 2006
Rainy days and projects
It's been raining steadily for three days now. That's typical for this time of the year. Fortunately I have the outside mowing done, and the spring garden weeded, so for once I have been able to sit back and enjoy several relaxing days off. I have been knitting alot and so have finished one sock and have the heel turned on it's mate. I should be able to finish the pair by this weekend.
Here's a photo.
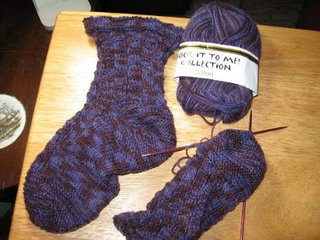
This pattern is from the yahoo group six-sox-knitalong. Members of the groups graciously supply a pattern on a quarterly basis. I joined this group earlier this spring and this is the first pair I have knitted from the group.
The flaired top of the sock is due to a knitted hemmed cuff. I don't really like the way it looks off of my foot, but it is a very comfortable design when being worn. Usually my knitted socks are too tight at the very top, but this turned hem is very loose and giving. There is a knitted pattern over the top of the foot that is very lovely but which does not show up unless closely inspected. It would be a good sock to do in a solid color, and not the variegated yarn I chose. The pattern would then show up better. The socks do knit up quickly, especially if you only make the top of the sock ankle 5-6 inches tall.
Another rainy day project that I love to do, is to go through old craft magazines. So often a knitting magazine gets looked at when it arrives in my mailbox and then filed away. I do make a list on my PDA of projects in that magazine that I feel would be interesting to do. But a lovely afternoon of just going through magazines with patterns always perks up my creative juices.
This rainy day magazine sorting was a bit different. Over the years I have been buying any old Workbasket magazines that I found. These little treasures of magazines had been published monthly for many many years. I have some from the late 1940's all the way through to the 1980's. Unfortunately these were inexpensive magazines, hardly made for archiving. They have browned with age, and are loose at the staples, or torn. Many have the original address labels still on them, and even notes made by the previous owner, her wishlist of things to make in that issue. I find all of this very charming.
I had searched for awhile for a way to store these gems in a more secure fashion and finally found photo sheets of archive safe plastic that were the exact size. Two issues slide nicely into one plastic sheet so only six are needed for a years worth of issues. I soon discovered that trying to put more than one year into an album constructed for those size pages was impossible, and that I really didn't want albums anyway. Instead I used quilters rust proof safety pins to secure the holes in the plastic pages, making a collection of each year. These then fit very nicely into a secure box, and all of them will be stored together that way.
But I am a long way from sticking them back into the closet. I have had so much enjoyment going through each one, and listing on a sheet of paper anything I found I may want reference to later. They are a wealth of tatting patterns, something I do not do well at all. They are a wealth of crochet doily patterns, something I can do but is not my favorite craft. However now and then there are wonderful knitted doilys, or edging patterns. These along with the more out of the ordinary (a poodle pin made from a piece of chenille bedspread!) were noted in my listings.
The earliest ones are the most fun, of course. As I got into the later 70's I could only laugh and my list definately got shorter. Ah but are not the fashions of the 70's and 80's being copied today for all of these new knitters? It's still wonderful inspiration to look at each design and see maybe a detail or a stitch pattern that can be used in a new way.
And one of the true pleasures was finding the patterns for things I have owned for years. Doilys that have those wonderful flowers in them, or the baby blanket pattern that someone made for my daughter. These were things that I had and admired for the workmanship, and here were the patterns for them! Here's a photo of my biggest find:
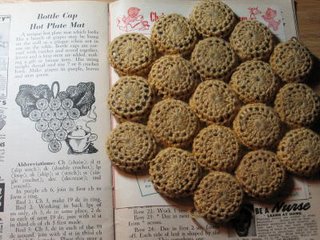
I had the hot pad for many years, rescued from some flea market. I knew it had bottle caps and crochet, but had never wanted to dissect the actual making of it. I had seen others like it, in the form of a cluster of grapes, I bought this one for the fact it was different from the ones I had seen the most. Some creative soul had just made one of their own design. Whether they used the idea from the Workbasket, or in later years was just messing around trying out the technique will never be known. But how much fun is it, to be thumbing through the old Workbasket and see the directions for something that I have loved and admired for so many years.
I am still working on rewriting my notes from the natural dye workshop. There are many pages and in no order at all. I am trying to get them into a good flowing description of the three day workshop. I find I am not getting it done, because I really do not want to sit down and do it. I find this surprising about myself. I had always thought I would enjoy being a writer, because I do love to tell a good tale. But this is the nuts and bolts of writing, taking notes and putting them into good copy. And to my surprise, I don't like to do it. Ah well, I have plenty of things to keep me occupied well into my ancient years. I guess I can let the idea of being a writer go the way of all good dreams. Meanwhile, I will put myself back into my school years, and get this 'report' done as soon as I can.
CW
Monday, April 24, 2006
A fibery getaway
I am going away for a three day workshop on natural dyeing this coming weekend. I am really looking forward to this, even if it means I have to get up and leave the house at 5 am to get to the class in time. Once I am there I will be staying in a motel. This was not the original plan, but with gas hitting $3.00 a gallon, it makes more sense than driving back and forth for the entire three days. So after a 9-5 class, and a nice dinner I will spend my evenings pampering myself with non stop knitting time!
Here is the class synopsis. I hope to take lots of notes and pictures and then condense the good bits to a blog entry later.
All about Silk
Preparation and handling
Techniques of Dyeing
Principles of Natual dyes
All the main mordants(alum, Tin, chrome, iron)
All the main, available and safe natural dystuffs(Indigo, Fustic, Madder, Brazilwood, Logwood, Cochineal and if time permits we will dye Black)
Paint-dyeing with natural dyes
You will take home:
10- 1/2 oz skeins(of fiber or fabric) of naturally dyed silks in these colors: blue(Indigo), green(Indigo and Fustic), magenta,rosemand plum(Cochineal), red(brazilwood), orange(madder), gold(Fustic), purple and silver(logwood)
An individual creation in your choice of colors on 2 oz of silk yarn or 3 oz of fiber or one yard of fabric
a 15" by 45" scarf length of silk fabric that you will paint dye in the colors you choose and with a design you create yourself.
A portfolio with printed intructions for all colors (and more) that we wil be doing, so you can be confident to continue at home on your own
A color chart with 8" samples of over thirty colors on silk yarn, for reference.
To get me in the mood for all of this (like I needed coaxing) I am boiling up a pot of the ragwort flowers tops, since they are full bloom right now in my front field. I hope to strain the liquid and then freeze it for later use to dye yarn that lovely gold color I got in the past. I don't really have any white yarn spun up right now, but I think freezing the dye will save it until it is ready.
CW
Wednesday, April 19, 2006
Learning Curves
I do not think I would knit if there was no challenge to it. That's why there are no afghans of endless garter stitch coming off my needles. I have reached the point in my knitting skills where I need the challenge to keep me knitting long enough to finish the project.
Sometimes the challenge comes from the fact I am creating the design myself. Sometimes the challenge is learning a complicated stitch. Lately the challenge has come from knitting two very complicated garments in two separate online knit alongs. I thought it be a good update to this blog to talk about them, both well under way, but far from finished. I have learned so much already, and have a problem to solve on one of them.
First thing I have learned is that it is a good thing to have two completely different type of knitting projects going at the same time. It allows me to detach from the frustrations of one, even if I find frustrations in the other! My two projects, the FLAK sweater and a lace knitted mystery shawl are as different as they can be. The lace shawl is on circular needles, and is following a very detailed chart. It does have the advantage, at least where I am right now of having a knit row between the pattern rows. This becomes very essential for counting stitches in the repeats, as I am much to busy trying to follow the chart when doing the pattern row, to try and count stitches also.
Both projects seem to have the limit of doing a few rows at a time. This is not because I have limited knitting time, it is because the patterned rows go so slow, and the number of stitches are so great, that it takes me a long time to complete each row. So my progress on each is slow, and slowed even more as I bounce back and forth between the two. I have no set goal for their completion. Most of the knitters in both of the knit along groups have completed theirs. I thought the knit alongs would make me feel pushed as far as knitting to keep up with the vast majority of the group, but I found I join the knit alongs more to read about the others progress and to pick up hints and tips as they experience the patterns for the first time. It has often helped in the long run to let the others find the problems and then just sail through that difficult patch, with their experience.
With the above generalization in mind, here are a few specifics I have learned on each project.
The mystery shawl is only to row 52. This was a start in the center in a circular start and increase outward from there. It will eventually be a square, which sounds weird, considering the circular start. The increases are making four pie shaped pieces, joined at the center, with an eventual shaping to a square. Some of the knitters are only doing half, making a triangle shaped shawl. That's an option I may consider down the road, if I do this pattern again. Each pie shaped piece repeats the same pattern, so on my needles I have the areas divided by stitch markers. Each repeat currently has 64 stitches so at only row 52 I have 256 stitches. This is why it takes me awhile to get through the knitting of a pattern row. And that will only get longer as I knit on. What have I learned? That I probably would like casting on a thousand stitches and decreasing, instead of casting on 8 and increasing to a 1000!
One of the major things to watch in the pattern is that the designer has put a YO as the first stitch of the design block. That means a YO falls just after one of my stitch markers. It took me almost the first 43 rows of never hitting the pattern right (that is, I would count the stitches on the knit row and be off a stitch here and there) to realize I really really had to watch those YO. They almost always flop over the stitch marker, ending up as the last stitch of the section, instead of the first of the next section. And when some would flip, and some wouldn't, I was off on my stitch count again and again.
Now I am not a perfectionist knitter. In fact, I would say that is one of my biggest flaws as a knitter, I have too much of a Oh never mind, attitude about it all. So those first 43 rows will definately show that I was not in line on the patterning. I am not concerned though for a number of reasons. This shawl is for me, those first 43 rows will be a tiny center of a large shawl, the shawl will most likely be folded in a triangle to wear, and well, all in all, this is all about loving and learning the knitting, not unknitting. So now that I have figured out that watching those YO's and getting them in the right place is my primary concern on the non patterned knit row, I have had very little problem with the stitch count, and my patterning is working out fine.
I do not have a picture of this yet, it is only just a puddle of lacy knitting between the circular needle. It may stay that way too until I am done, so when I post a picture of the final shawl, I will probably be just as surprised at it's appearance, as anyone reading this. The yarn is a lace weight, Cherry tree merino in muted colors against a brown. It's just lovely to work with the subtle blends of the coloration is fascinating to me, when I do finally look at the shawl, beyond the chart following and counting.
Now for the FLAK sweater. That's follow the leader aran knitalong for anyone unfamiliar with the term. What have I learned? Oh a lesson so big, it deserves capital letters.
IF YOU ARE GOING TO KNIT A SWEATER FOR SOMEONE OTHER THAN YOURSELF, MEASURE THEIR BODY, NOT ONE OF THEIR SWEATERS.
See, I have plans to knit this sweater for my hubby, and surprise him with it. It was no big deal to knit in front of him, he had no clue I was knitting it for anyone else but myself. The knit along was all set up to be about knitting a sweater that fit, because the designer Janet Szabo gave wonderful sections on measuring and swatching and calculating for a perfect fit. I was the unknown factor in this process, because in my attempt to surprise my hubby, I used the alternative suggestion of measuring a sweater that fit instead of the body (stated as a possibility if one could not really do the measurements by themselves, on themselves.) So I grabbed a bulky sweater that hubby had on the cedar chest at the foot of the bed, measured it and proceeded with those measurements. Never mind I had never seen the actual sweater on hubby. So maybe the other capital letter learning should be, never assume that just because a sweater is out and in full view, that spouses actual can wear them.
Yep, you saw it coming. Said sweater is too small. So now my FLAK sweater for hubby is too small. I found this out, after knitting one full sleeve and a third of the other. Based on the experience of the last sweater I did for my daughter, and the sleeves ending up too large, I finally broke down several weekends ago and had hubby try on the FLAK. That's when it was discovered that the sweater could use 1-2 inches of ease around the body, and that the armhole depth is much too tight, it needs 2 inches at least also.
Here's a picture of how it looks so far:

See how it basically is long long rectangle including the sleeves. The next step after the sleeves are finished would be to sew up the sleeves (some knitters are even doing the sleeves in the round, but I like the straight needles) and pick up stitches all the way around the body in the round and knit to the bottom. So in my thinking about the sweater being too small I feel it is possible to add to the sweater yet at this point, before that final step. I have lots of time to think about this fix, as I knit the endless moss stitch of the sleeves (which, surprising I like doing better than endless garter or stockinette stitch even though it does mean switching from a knit to purl with every stitch). In fact this stretch of mindless knitting has been fun, because it allowed me also to watch a whole season of Battlestar galactica, while knitting. But I also have been mulling over possible ways to make this sweater eventually fit.
Here's the plan at this point: Since the armhole depth is based on stitches picked up at the front and back edges, that means I need more stitches there to use to pick up and add to the sleeve. See how the sleeves and the front are the same right now? I plan to knit an inch more down both sides of the front and back. That will give me a total of two inches next to the sleeve. If I tied my yarn on right next to the sleeve edge and one of those stitches, I can pick up the first inch, go to the other side of the sleeve, and pick up an inch from those stitches. This two inches will be knit in the moss stitch, as I go down the sleeve catching each sleeve edge and closing the sleeve with knitting instead of seaming the sleeve. The other option is to pick up the inch of stitches and knit those separately, and then seam the sleeve. I will decide which looks better, after I actually get into the process. I think this will solve the problem of the too tight sleeve, without actually frogging miles of moss stitch and starting over.
It may or may not solve the ease needed around the body. But I do not consider this a major problem, because right now, with just putting the sweater over hubby, with all of the unfinished seams etc, I am not really sure the fit is all that far off. And once I get the sleeves closed and have him try it on, I will be able to tell if the body needs ease or not. If it does, I will increase stitches as I pick up the body and add the ease at that point.
Lesson learned. Challenge thought about but not accomplished. It will be interesting to see just what happens and how the final product looks. I am less concerned about appearance though, than comfort. I truly want him to wear the sweater, I feel that way about anything I make. That's why I am not a perfectionist knitter. It is not about how it looks, just about how it feels.
So no finished projects to report, just progress. In the same way, my spinning is still in progress too. Remember the Olympic challenge to spin while watching the olympics? Well here is an 'in progress' picture. With the wonders of DVR dish recording I still have 20 hours of olympics to watch. And to me that means another 20 hours of spinning time. So it will be awhile before the final photo of all the yarn. Meanwhile, here's a picture of my spinning world, my easy chair, my Roberta electric spinner, my yarn on the niddy noddy. I suppose I should have included the cup of coffee (I always do my spinning in the mornings before work) and the TV remote too!
CW

Sometimes the challenge comes from the fact I am creating the design myself. Sometimes the challenge is learning a complicated stitch. Lately the challenge has come from knitting two very complicated garments in two separate online knit alongs. I thought it be a good update to this blog to talk about them, both well under way, but far from finished. I have learned so much already, and have a problem to solve on one of them.
First thing I have learned is that it is a good thing to have two completely different type of knitting projects going at the same time. It allows me to detach from the frustrations of one, even if I find frustrations in the other! My two projects, the FLAK sweater and a lace knitted mystery shawl are as different as they can be. The lace shawl is on circular needles, and is following a very detailed chart. It does have the advantage, at least where I am right now of having a knit row between the pattern rows. This becomes very essential for counting stitches in the repeats, as I am much to busy trying to follow the chart when doing the pattern row, to try and count stitches also.
Both projects seem to have the limit of doing a few rows at a time. This is not because I have limited knitting time, it is because the patterned rows go so slow, and the number of stitches are so great, that it takes me a long time to complete each row. So my progress on each is slow, and slowed even more as I bounce back and forth between the two. I have no set goal for their completion. Most of the knitters in both of the knit along groups have completed theirs. I thought the knit alongs would make me feel pushed as far as knitting to keep up with the vast majority of the group, but I found I join the knit alongs more to read about the others progress and to pick up hints and tips as they experience the patterns for the first time. It has often helped in the long run to let the others find the problems and then just sail through that difficult patch, with their experience.
With the above generalization in mind, here are a few specifics I have learned on each project.
The mystery shawl is only to row 52. This was a start in the center in a circular start and increase outward from there. It will eventually be a square, which sounds weird, considering the circular start. The increases are making four pie shaped pieces, joined at the center, with an eventual shaping to a square. Some of the knitters are only doing half, making a triangle shaped shawl. That's an option I may consider down the road, if I do this pattern again. Each pie shaped piece repeats the same pattern, so on my needles I have the areas divided by stitch markers. Each repeat currently has 64 stitches so at only row 52 I have 256 stitches. This is why it takes me awhile to get through the knitting of a pattern row. And that will only get longer as I knit on. What have I learned? That I probably would like casting on a thousand stitches and decreasing, instead of casting on 8 and increasing to a 1000!
One of the major things to watch in the pattern is that the designer has put a YO as the first stitch of the design block. That means a YO falls just after one of my stitch markers. It took me almost the first 43 rows of never hitting the pattern right (that is, I would count the stitches on the knit row and be off a stitch here and there) to realize I really really had to watch those YO. They almost always flop over the stitch marker, ending up as the last stitch of the section, instead of the first of the next section. And when some would flip, and some wouldn't, I was off on my stitch count again and again.
Now I am not a perfectionist knitter. In fact, I would say that is one of my biggest flaws as a knitter, I have too much of a Oh never mind, attitude about it all. So those first 43 rows will definately show that I was not in line on the patterning. I am not concerned though for a number of reasons. This shawl is for me, those first 43 rows will be a tiny center of a large shawl, the shawl will most likely be folded in a triangle to wear, and well, all in all, this is all about loving and learning the knitting, not unknitting. So now that I have figured out that watching those YO's and getting them in the right place is my primary concern on the non patterned knit row, I have had very little problem with the stitch count, and my patterning is working out fine.
I do not have a picture of this yet, it is only just a puddle of lacy knitting between the circular needle. It may stay that way too until I am done, so when I post a picture of the final shawl, I will probably be just as surprised at it's appearance, as anyone reading this. The yarn is a lace weight, Cherry tree merino in muted colors against a brown. It's just lovely to work with the subtle blends of the coloration is fascinating to me, when I do finally look at the shawl, beyond the chart following and counting.
Now for the FLAK sweater. That's follow the leader aran knitalong for anyone unfamiliar with the term. What have I learned? Oh a lesson so big, it deserves capital letters.
IF YOU ARE GOING TO KNIT A SWEATER FOR SOMEONE OTHER THAN YOURSELF, MEASURE THEIR BODY, NOT ONE OF THEIR SWEATERS.
See, I have plans to knit this sweater for my hubby, and surprise him with it. It was no big deal to knit in front of him, he had no clue I was knitting it for anyone else but myself. The knit along was all set up to be about knitting a sweater that fit, because the designer Janet Szabo gave wonderful sections on measuring and swatching and calculating for a perfect fit. I was the unknown factor in this process, because in my attempt to surprise my hubby, I used the alternative suggestion of measuring a sweater that fit instead of the body (stated as a possibility if one could not really do the measurements by themselves, on themselves.) So I grabbed a bulky sweater that hubby had on the cedar chest at the foot of the bed, measured it and proceeded with those measurements. Never mind I had never seen the actual sweater on hubby. So maybe the other capital letter learning should be, never assume that just because a sweater is out and in full view, that spouses actual can wear them.
Yep, you saw it coming. Said sweater is too small. So now my FLAK sweater for hubby is too small. I found this out, after knitting one full sleeve and a third of the other. Based on the experience of the last sweater I did for my daughter, and the sleeves ending up too large, I finally broke down several weekends ago and had hubby try on the FLAK. That's when it was discovered that the sweater could use 1-2 inches of ease around the body, and that the armhole depth is much too tight, it needs 2 inches at least also.
Here's a picture of how it looks so far:
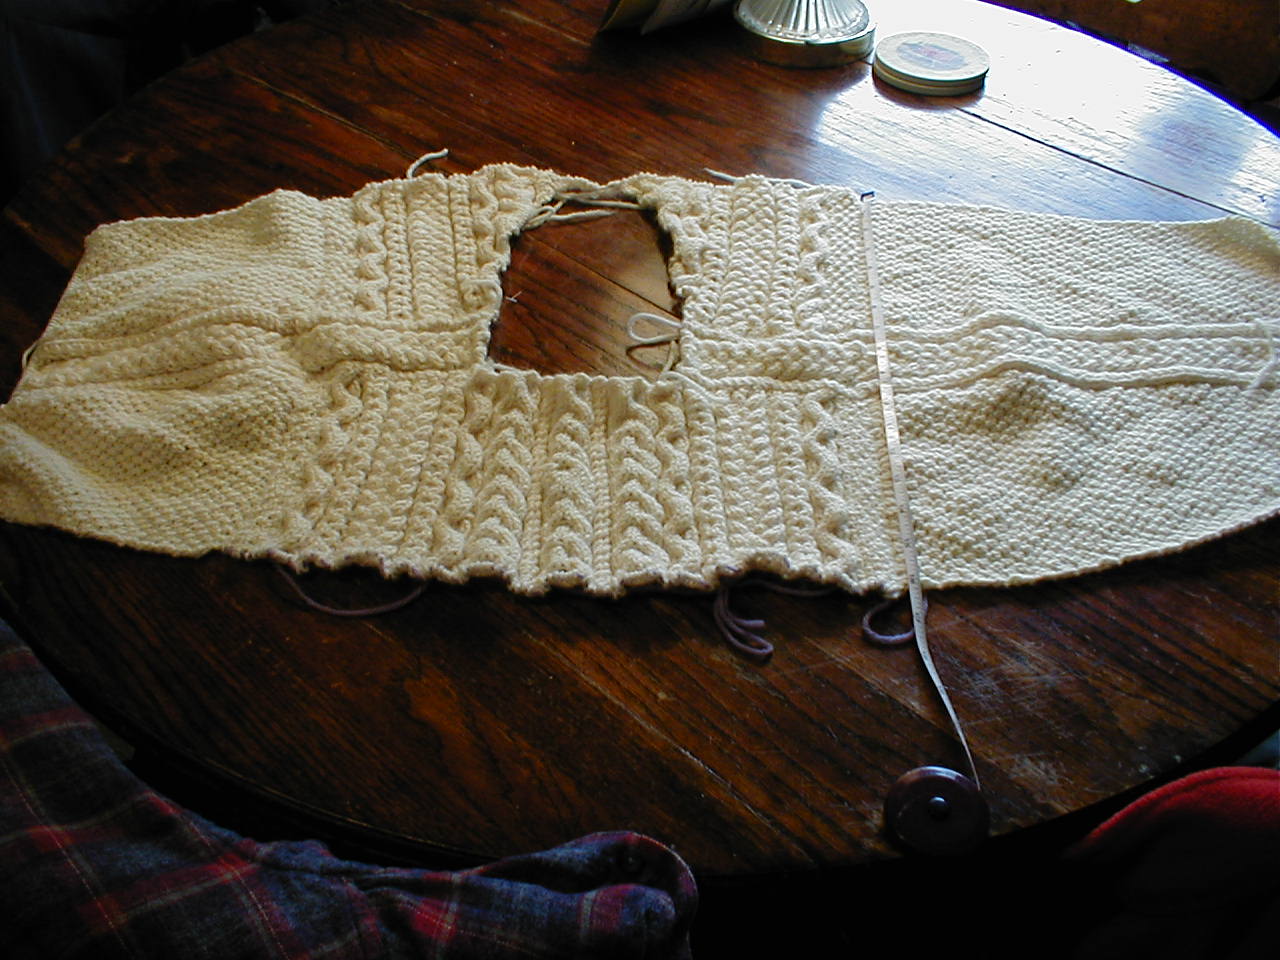
See how it basically is long long rectangle including the sleeves. The next step after the sleeves are finished would be to sew up the sleeves (some knitters are even doing the sleeves in the round, but I like the straight needles) and pick up stitches all the way around the body in the round and knit to the bottom. So in my thinking about the sweater being too small I feel it is possible to add to the sweater yet at this point, before that final step. I have lots of time to think about this fix, as I knit the endless moss stitch of the sleeves (which, surprising I like doing better than endless garter or stockinette stitch even though it does mean switching from a knit to purl with every stitch). In fact this stretch of mindless knitting has been fun, because it allowed me also to watch a whole season of Battlestar galactica, while knitting. But I also have been mulling over possible ways to make this sweater eventually fit.
Here's the plan at this point: Since the armhole depth is based on stitches picked up at the front and back edges, that means I need more stitches there to use to pick up and add to the sleeve. See how the sleeves and the front are the same right now? I plan to knit an inch more down both sides of the front and back. That will give me a total of two inches next to the sleeve. If I tied my yarn on right next to the sleeve edge and one of those stitches, I can pick up the first inch, go to the other side of the sleeve, and pick up an inch from those stitches. This two inches will be knit in the moss stitch, as I go down the sleeve catching each sleeve edge and closing the sleeve with knitting instead of seaming the sleeve. The other option is to pick up the inch of stitches and knit those separately, and then seam the sleeve. I will decide which looks better, after I actually get into the process. I think this will solve the problem of the too tight sleeve, without actually frogging miles of moss stitch and starting over.
It may or may not solve the ease needed around the body. But I do not consider this a major problem, because right now, with just putting the sweater over hubby, with all of the unfinished seams etc, I am not really sure the fit is all that far off. And once I get the sleeves closed and have him try it on, I will be able to tell if the body needs ease or not. If it does, I will increase stitches as I pick up the body and add the ease at that point.
Lesson learned. Challenge thought about but not accomplished. It will be interesting to see just what happens and how the final product looks. I am less concerned about appearance though, than comfort. I truly want him to wear the sweater, I feel that way about anything I make. That's why I am not a perfectionist knitter. It is not about how it looks, just about how it feels.
So no finished projects to report, just progress. In the same way, my spinning is still in progress too. Remember the Olympic challenge to spin while watching the olympics? Well here is an 'in progress' picture. With the wonders of DVR dish recording I still have 20 hours of olympics to watch. And to me that means another 20 hours of spinning time. So it will be awhile before the final photo of all the yarn. Meanwhile, here's a picture of my spinning world, my easy chair, my Roberta electric spinner, my yarn on the niddy noddy. I suppose I should have included the cup of coffee (I always do my spinning in the mornings before work) and the TV remote too!
CW
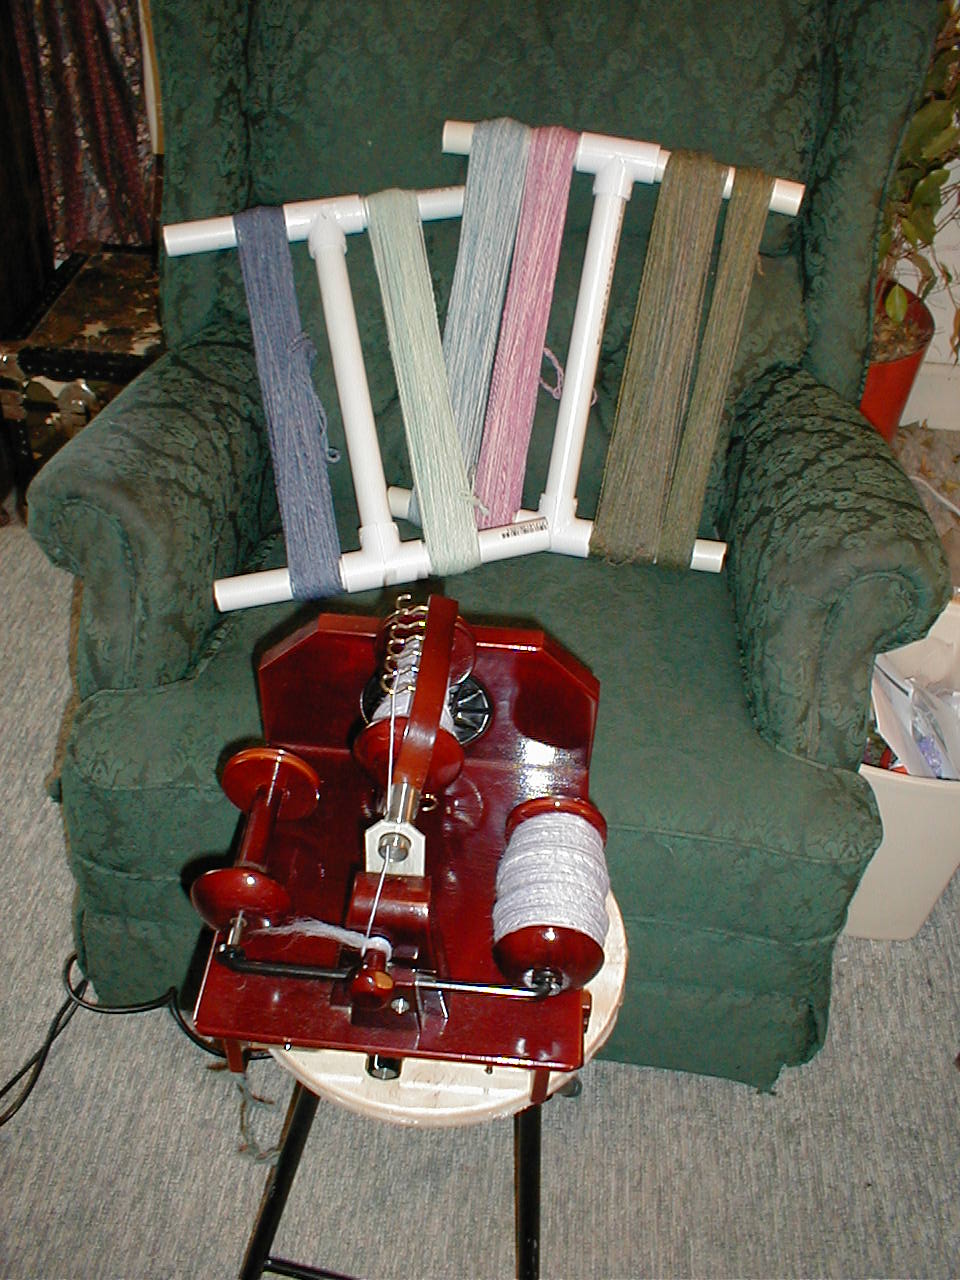
Saturday, March 11, 2006
How not to knit sleeves on a cotton sweater
Sometimes, drastic problems call for drastic solutions.
Two years ago I began knitting this cotton cardigan for my daughter. It's a challenging pattern done in a worsted weight cotton. We measured and swatched and washed swatches and remeasured. Basically the sweater body came out to her satisfaction, but the sleeves were massively too large. This was discovered late last fall, shortly before her wedding. We said, OK try washing the sweater and see if the sleeves improve. Months passed, and finally one knitting group day, my daughter returned the sweater to me. The sleeves were just too large, could we do anything about it?
Here's a photo on the original sweater sleeve:

I confess I stuck the sweater in a drawer for awhile trying to decide what to do. I now understood how the sleeves came to be too big, besides the maybe too few decreases. I had adapted the pattern. Instead of knitting the sleeves as separate pieces using straight knitting needles, I had taken circular needles, picked up stitches all around the armhole and knitted down to the cuff. Normally, this is a very good idea. However with this cotton yarn, the circulars stretched the yarn, causing a bigger gauge. And that meant the sleeve was too wide by about 4 inches. My choices were to completely reknit two sleeves, using the original design, or to try and fit the current sleeves to her size.
Nothing ventured, nothing gained the saying goes. If I cut and sewed the current sleeves and they didn't work, I was only back to reknitting them again with new yarn. Fortunately there was plenty of yarn left over, I had been knitting from large cones of cotton yarn and had a full cone left. So I switched my mindset from that of a knitter to that of a seamstress, and tackled the project of making the sleeve fit.
First I made a paper pattern piece of the way the sleeve would have been if knit flat. Here's a picture of the sleeve with the pattern piece on it, which shows how the sleeve had flaired too wide.
I actually wrapped the pattern piece around the sleeve, putting the excess fabric on the underarm side. Then I took thick crochet cotton and did a running stitch down the sides of the pattern on the sweater. Basically this gave me a section outlined on the sleeve that should be removed. I had to then cut up the middle of that area from cuff to armhole, so the sleeve would be flat. Once it was flat I could easily sew two close set lines of stitching next to the basting marks, and cut away the excess knitting. I then treated it just like a sewn sleeve, by laying the two right sides together and doing an overlap type stitch to sew the sleeve back together.
Here's a photo of the inside and the seam. It's not pretty, but it did seem secure.

On the outside, it's almost impossible to even see the seam:
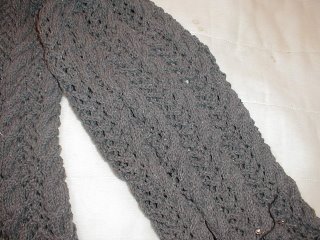
I was finally sure it all worked well though, when my daughter tried it on that night. Here's the final picture of the finished sweater on her.

I have heard many horror stories about knitting sweaters in cotton yarn. I now seem to have my own to add to them. I will say that this pattern did knit up well in cotton. All of the cabling gave a nice firm feel to the fabric and kept the stretch to a minimum. Except of course for those sleeves!
CW
Two years ago I began knitting this cotton cardigan for my daughter. It's a challenging pattern done in a worsted weight cotton. We measured and swatched and washed swatches and remeasured. Basically the sweater body came out to her satisfaction, but the sleeves were massively too large. This was discovered late last fall, shortly before her wedding. We said, OK try washing the sweater and see if the sleeves improve. Months passed, and finally one knitting group day, my daughter returned the sweater to me. The sleeves were just too large, could we do anything about it?
Here's a photo on the original sweater sleeve:

I confess I stuck the sweater in a drawer for awhile trying to decide what to do. I now understood how the sleeves came to be too big, besides the maybe too few decreases. I had adapted the pattern. Instead of knitting the sleeves as separate pieces using straight knitting needles, I had taken circular needles, picked up stitches all around the armhole and knitted down to the cuff. Normally, this is a very good idea. However with this cotton yarn, the circulars stretched the yarn, causing a bigger gauge. And that meant the sleeve was too wide by about 4 inches. My choices were to completely reknit two sleeves, using the original design, or to try and fit the current sleeves to her size.
Nothing ventured, nothing gained the saying goes. If I cut and sewed the current sleeves and they didn't work, I was only back to reknitting them again with new yarn. Fortunately there was plenty of yarn left over, I had been knitting from large cones of cotton yarn and had a full cone left. So I switched my mindset from that of a knitter to that of a seamstress, and tackled the project of making the sleeve fit.
First I made a paper pattern piece of the way the sleeve would have been if knit flat. Here's a picture of the sleeve with the pattern piece on it, which shows how the sleeve had flaired too wide.

I actually wrapped the pattern piece around the sleeve, putting the excess fabric on the underarm side. Then I took thick crochet cotton and did a running stitch down the sides of the pattern on the sweater. Basically this gave me a section outlined on the sleeve that should be removed. I had to then cut up the middle of that area from cuff to armhole, so the sleeve would be flat. Once it was flat I could easily sew two close set lines of stitching next to the basting marks, and cut away the excess knitting. I then treated it just like a sewn sleeve, by laying the two right sides together and doing an overlap type stitch to sew the sleeve back together.
Here's a photo of the inside and the seam. It's not pretty, but it did seem secure.
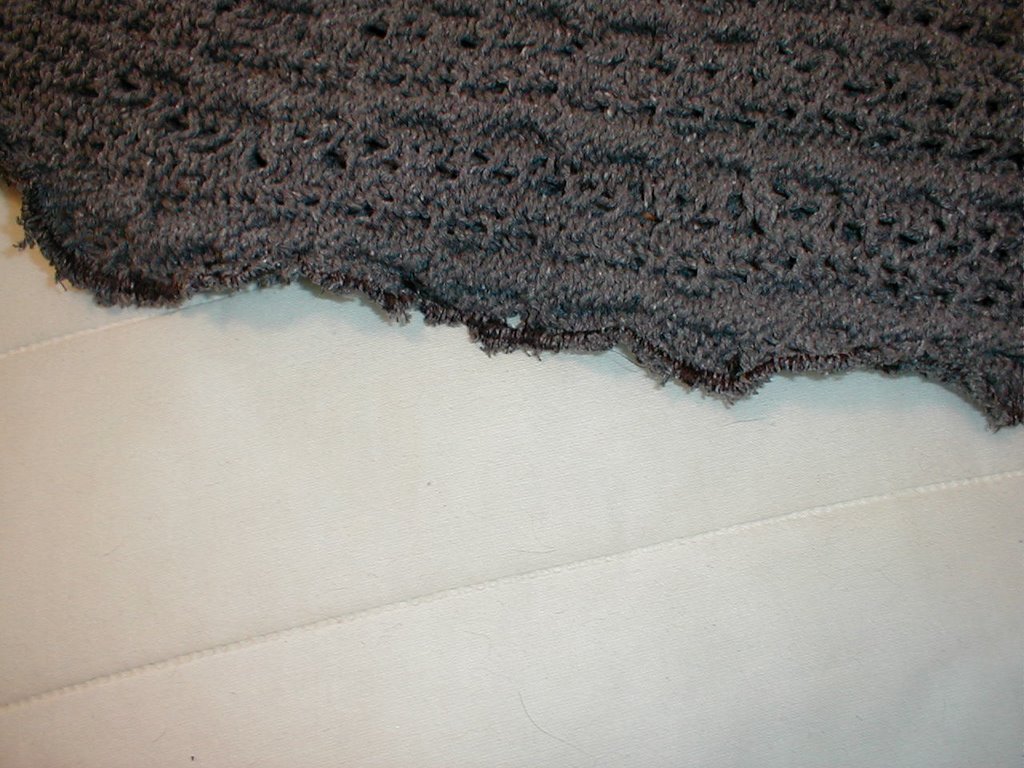
On the outside, it's almost impossible to even see the seam:
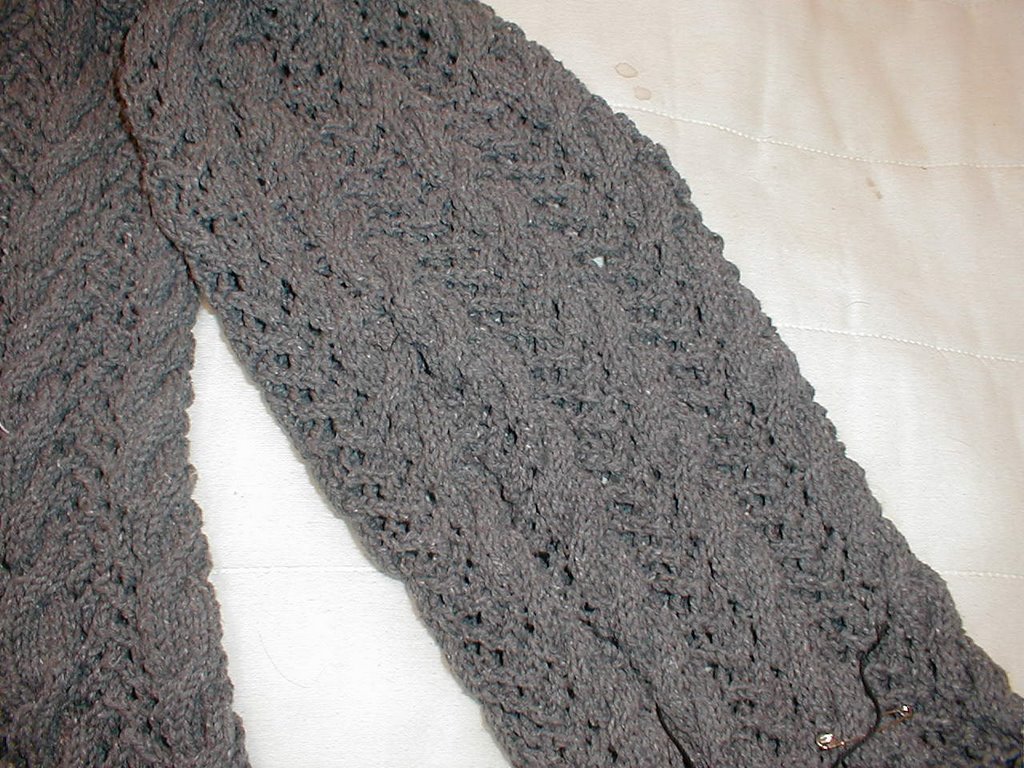
I was finally sure it all worked well though, when my daughter tried it on that night. Here's the final picture of the finished sweater on her.
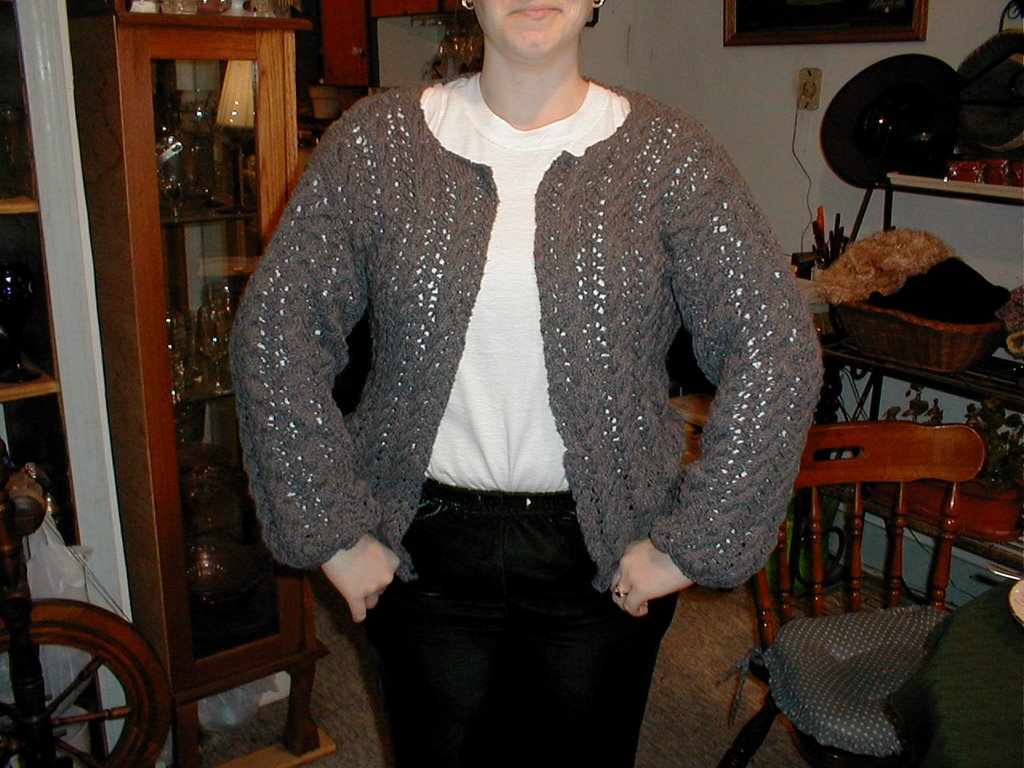
I have heard many horror stories about knitting sweaters in cotton yarn. I now seem to have my own to add to them. I will say that this pattern did knit up well in cotton. All of the cabling gave a nice firm feel to the fabric and kept the stretch to a minimum. Except of course for those sleeves!
CW
Tuesday, March 07, 2006
vacation knitting
A vacation means a driving trip, and that means lots of knitting time for me. I do take my share of driving, but try and plan it after dark when I wouldn't be knitting anyway. So having returned from a recent vacation, I have a few photos to share of progress on the FLAK sweater, and a finished project.
First the finished project:

Both yarns are commercial alpaca called Baby Twist, and are very soft. I originally made the headband, because I fell in love with the dyed and sparkly skein of alpaca yarn, but there was only one skein at the store. So I did the headband, thinking that would use the whole skein. When there was over half of the skein left, I bought more black alpaca, using the pretty yarn as a stripe. Even that didn't use up all of the yarn! I imagine my next step will be to buy yet more black yarn and make a matching scarf. Good thing the black alpaca is a yarn the shop stocks!
I spent most of my non driving knitting time working on the aran knit along sweater (known as the FLAK). I got through the first five installments, which makes the sweater have the back and front knitted down to about underarm level. This sweater is being knit top down, and we started with the saddles, those bands across the shoulder, then picked up stiches for the back, and knit to desired length. The front was the same process except we had to shape a neckline. The nice thing about this knit along is that the designer is offering options for different looks. If I wanted a rounded neckline, I would have increased only a few rows. I chose the V neck line and so did increases all through the knitting of the front. I did each side separately, finally joining and knitting a few rows at the end of the V.

One of the challenges on this was to reverse the knitting order of the cables, so that they matched the order presented on the back. It wasn't hard, once I got a good start on the cables and could see them developing, but at the beginning, I often felt my mind crossing, right along with those stitches, as I tried to work out which cable pattern was next. Add to that was the constant increases at the neck edge which would have to be a cable, once there were enough stitches. I finished the front almost literally right before we got in the car to start home, I knew I would not work on it in the car, and wanted it to be ready for the next installment when I got home. As it has turned out, I have not knitted on it for a week now, even though the sleeve installment is printed out and ready to go. I think I needed a cable break.
The yarn I am using is from my stash, a sale bin purchase several years ago. It is called lana Moro and it is 50/50 wool/acrylic. I love the stitch definition on the cables with this yarn.
What I have been knitting on this week is the start of mystery shawl along 3. I am using Cherry Tree Hill merino lace yarn in the color Java. The shawl has a circular start, and I have about 20 rows done, but that blob of yarn and needles is not very photogenic. So instead I have a photo of the swatch I made to decide on needle size.

I am hoping that the subtle colors of the yarn show in this photo. I took the picture outside hoping to get the sunshine on the colors. It's a fantastic yarn to knit, so soft and subtle in the coloring. I am expecting the shawl to be very lovely when it is done.
I am still Olympic spinning, even though the olympics are long over. With the wonders of modern technology, I have about 75 hours yet taped on my dish DVD. I am planning to watch it all, and spin, to complete my self made challenge of seeing how much yarn I can spin. Right now I am spinning a lovely merino silk blend I got when I went to SOAR. It is spinning like a dream, but there is alot of the fiber, so I have over 7 hours spinning time in it already and am only on my second bobbin. That's the problem with very fine spinning, it does not make the stash reduction happen! But the good side of that is the nice lovely lace weight yarn that I can use for my current knitting obsession, a shawl.
CW
First the finished project:
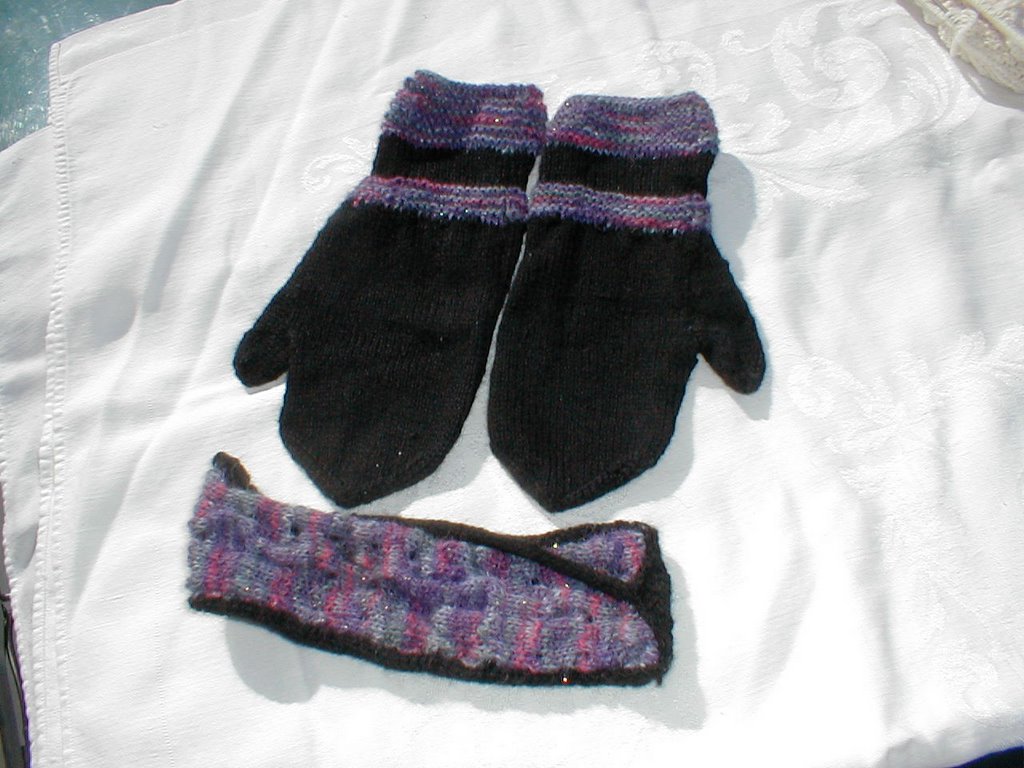
Both yarns are commercial alpaca called Baby Twist, and are very soft. I originally made the headband, because I fell in love with the dyed and sparkly skein of alpaca yarn, but there was only one skein at the store. So I did the headband, thinking that would use the whole skein. When there was over half of the skein left, I bought more black alpaca, using the pretty yarn as a stripe. Even that didn't use up all of the yarn! I imagine my next step will be to buy yet more black yarn and make a matching scarf. Good thing the black alpaca is a yarn the shop stocks!
I spent most of my non driving knitting time working on the aran knit along sweater (known as the FLAK). I got through the first five installments, which makes the sweater have the back and front knitted down to about underarm level. This sweater is being knit top down, and we started with the saddles, those bands across the shoulder, then picked up stiches for the back, and knit to desired length. The front was the same process except we had to shape a neckline. The nice thing about this knit along is that the designer is offering options for different looks. If I wanted a rounded neckline, I would have increased only a few rows. I chose the V neck line and so did increases all through the knitting of the front. I did each side separately, finally joining and knitting a few rows at the end of the V.

One of the challenges on this was to reverse the knitting order of the cables, so that they matched the order presented on the back. It wasn't hard, once I got a good start on the cables and could see them developing, but at the beginning, I often felt my mind crossing, right along with those stitches, as I tried to work out which cable pattern was next. Add to that was the constant increases at the neck edge which would have to be a cable, once there were enough stitches. I finished the front almost literally right before we got in the car to start home, I knew I would not work on it in the car, and wanted it to be ready for the next installment when I got home. As it has turned out, I have not knitted on it for a week now, even though the sleeve installment is printed out and ready to go. I think I needed a cable break.
The yarn I am using is from my stash, a sale bin purchase several years ago. It is called lana Moro and it is 50/50 wool/acrylic. I love the stitch definition on the cables with this yarn.
What I have been knitting on this week is the start of mystery shawl along 3. I am using Cherry Tree Hill merino lace yarn in the color Java. The shawl has a circular start, and I have about 20 rows done, but that blob of yarn and needles is not very photogenic. So instead I have a photo of the swatch I made to decide on needle size.

I am hoping that the subtle colors of the yarn show in this photo. I took the picture outside hoping to get the sunshine on the colors. It's a fantastic yarn to knit, so soft and subtle in the coloring. I am expecting the shawl to be very lovely when it is done.
I am still Olympic spinning, even though the olympics are long over. With the wonders of modern technology, I have about 75 hours yet taped on my dish DVD. I am planning to watch it all, and spin, to complete my self made challenge of seeing how much yarn I can spin. Right now I am spinning a lovely merino silk blend I got when I went to SOAR. It is spinning like a dream, but there is alot of the fiber, so I have over 7 hours spinning time in it already and am only on my second bobbin. That's the problem with very fine spinning, it does not make the stash reduction happen! But the good side of that is the nice lovely lace weight yarn that I can use for my current knitting obsession, a shawl.
CW
Monday, February 13, 2006
Olympic spinning challenge: first and last place
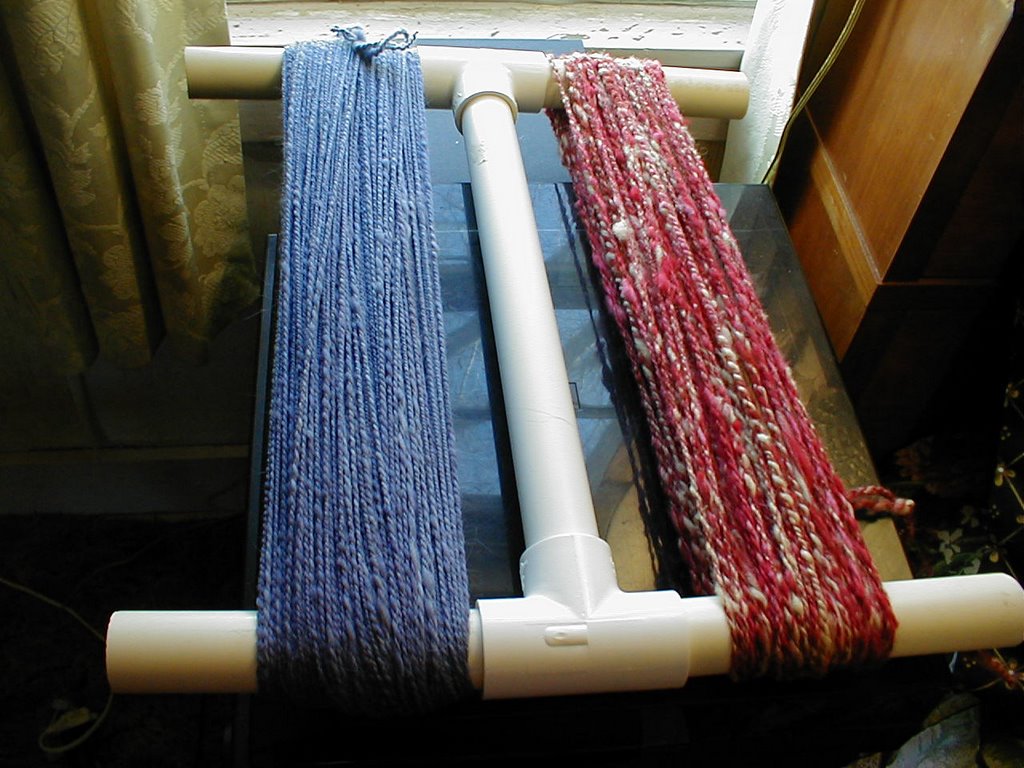
Maybe not really first place, but first completed skein goes to the blue merino/angora blend. There is 230 yards of a 2 ply yarn, and it is lovely enough at this point to hold first place in my eyes.
Last place? A total failed attempt to save a dyed roving that I had no business saving. The fibers were corriedale (the off white color in the blend) and cotswold, the dyed part of the blend. The corriedale fiber was moderately decent, it had a few tangled areas and short cuts. It tended to clump and not draft well, probably due to maybe not being completely carded. The cotswold turned cottony after dyeing, and was filled with short cuts (slubs) that no amount of picking out could remove. Add up all of these factors and the blend was almost impossible to spin. I loved the dye scheme though and will consult by dye notebook again to use it. It just was not worth fussing though 8 oz of this terrible roving to try and spin any kind of yarn. I will not spin lousy roving to try and come up with a 'designer yarn'. So the 20 yards of 2 ply lumpy awfulness will stick around my spinning basket as a reminder that it really is not worth working with lousy roving. The rest of the unspun went in the trash. Oh I know I could have used it for stuffing, or for felting fiber, or even mulching my roses. I prefer to have it gone for good.
Now to find something satisfying to spin. Will it be the silky speed of the icy track, the colorful figure skating of a wonderfully dyed roving or the mundane cross country slogging of spinning a pound of natural colored border leicester?
CW
Subscribe to:
Posts (Atom)